Application Manual
Create your own query
So far we have been working with pre-built queries to understand the way they work. This section will show how to build a query from scratch to create a network around the genes, proteins, etc of interest for you.

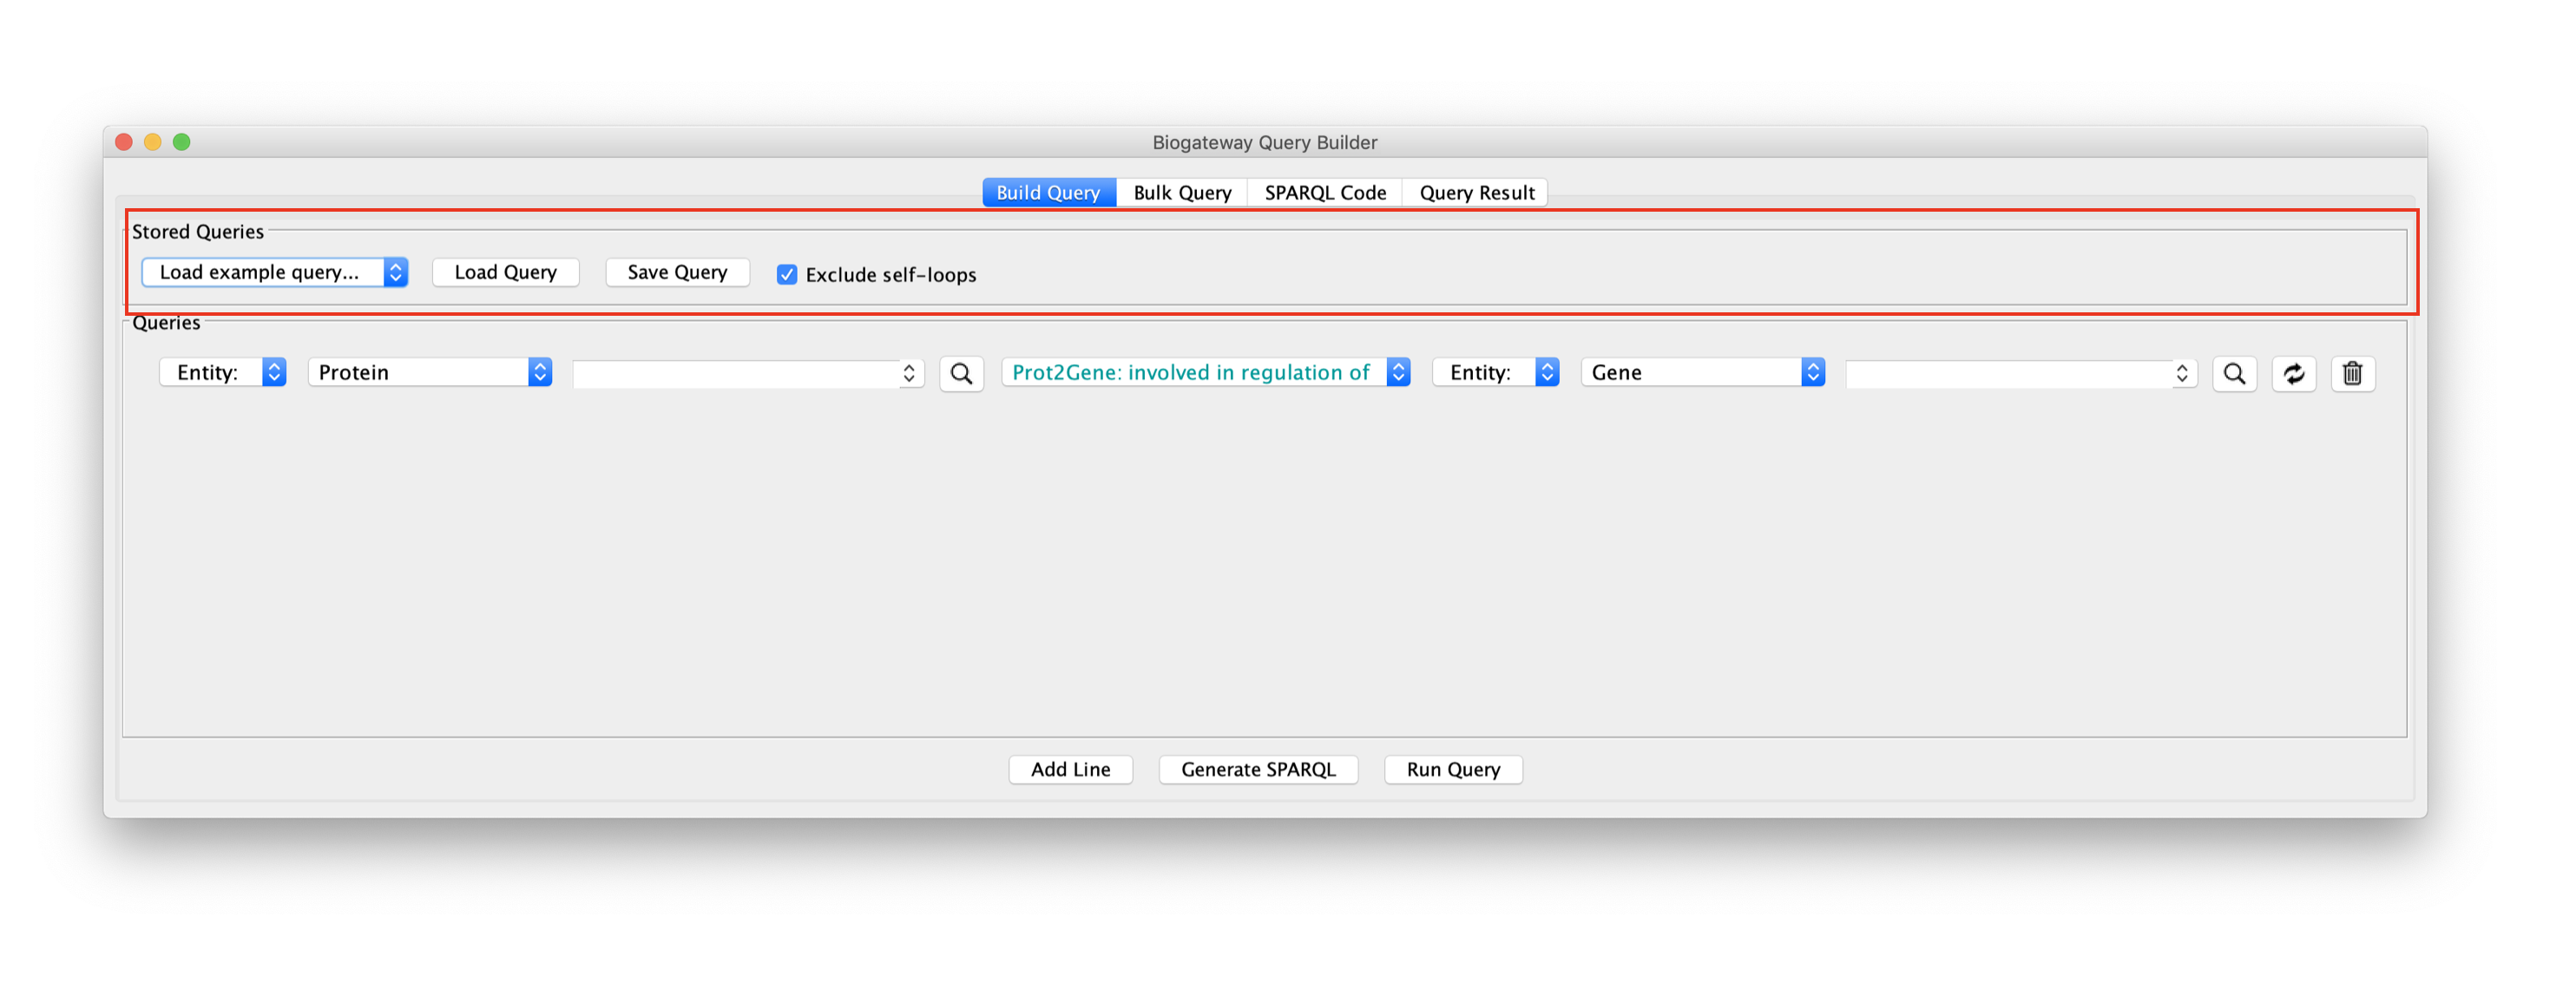
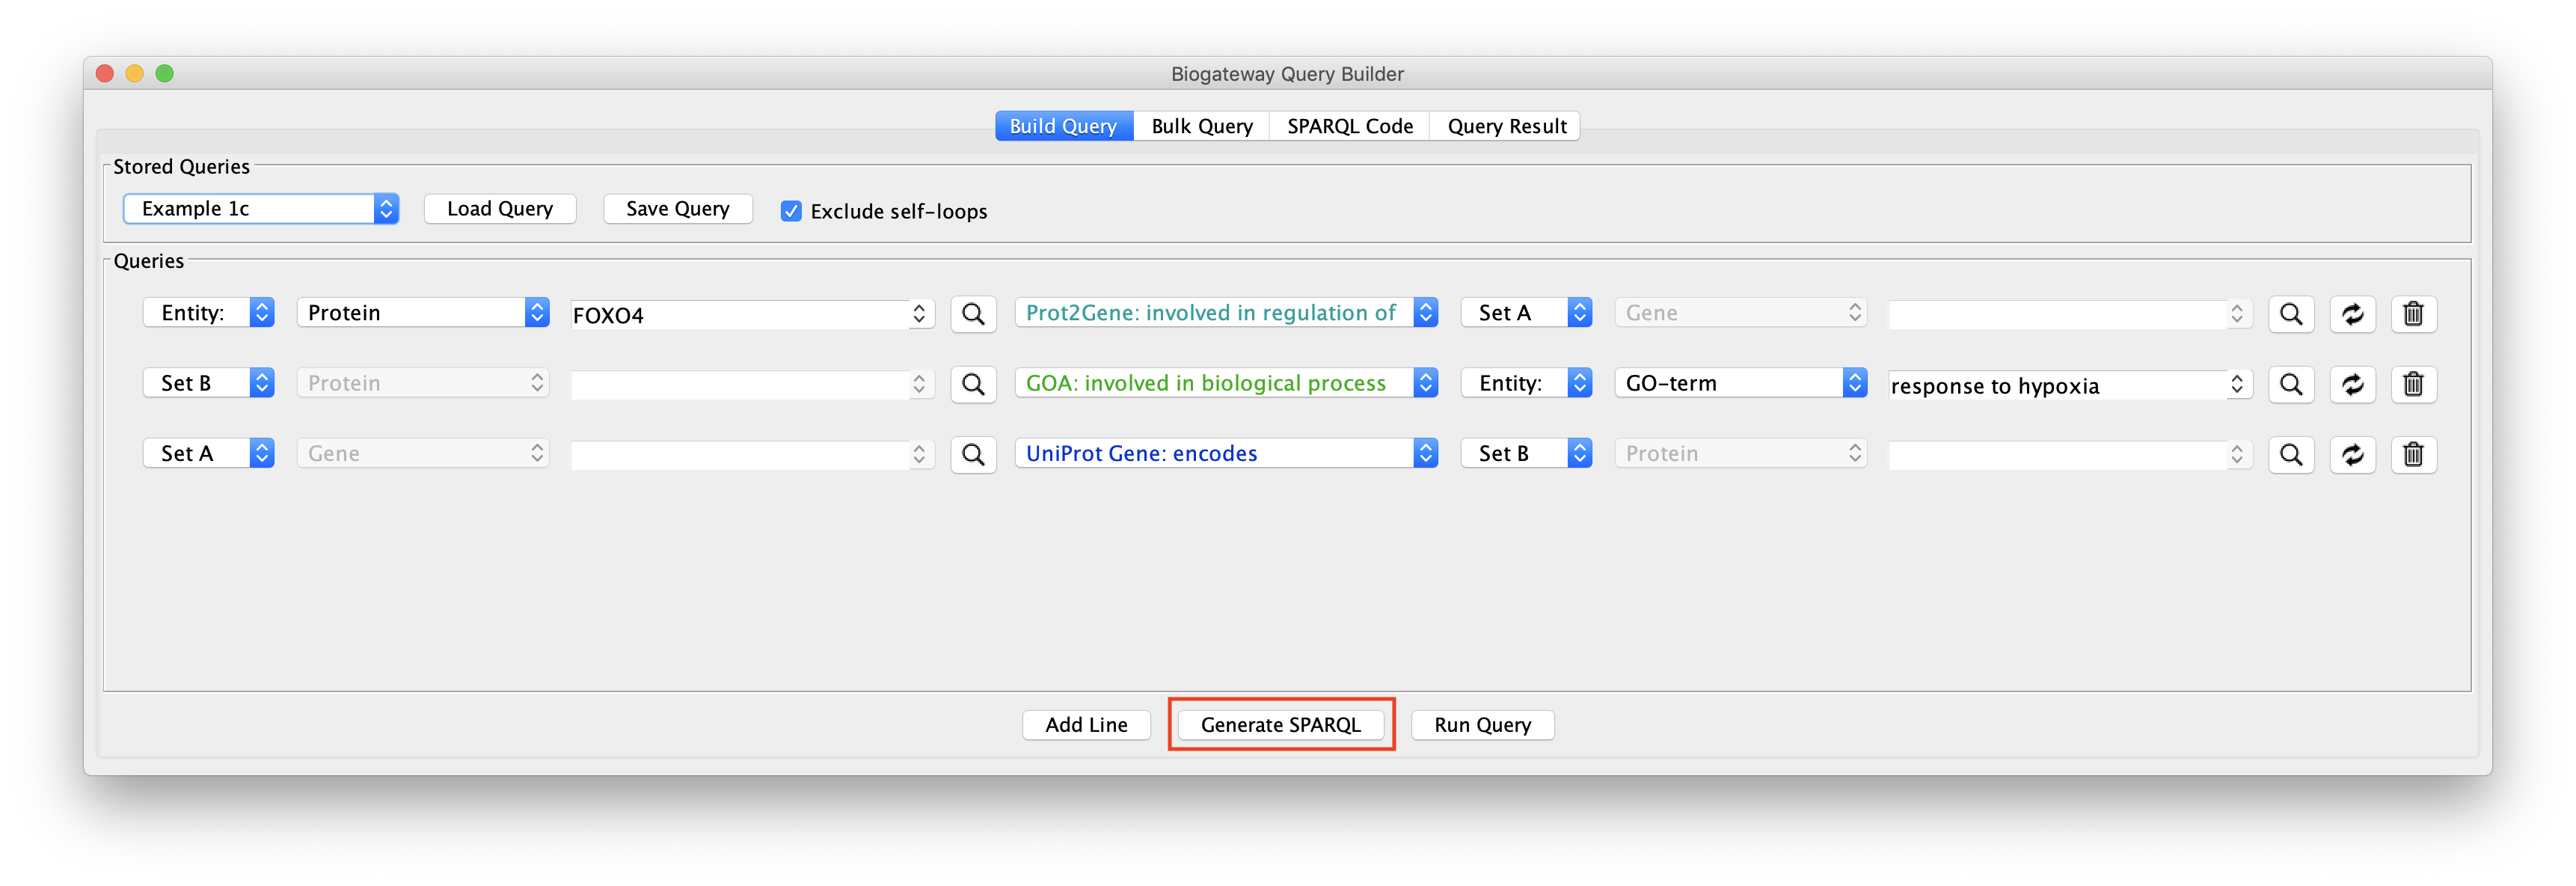
The Query Builder. The fields marked red are described below
When building a query, it is mandatory to specify the following parameters:
- Entity or Set: this has to be set for both the Subject and the Object. This allows to select whether the Subject/Object is a specific biological entity (e.g. a specific protein, gene, etc) or a Set of entities. In the figure above the Subject is defined as Entity and the Object is defined as Set A. Note that the number of possible Sets shown in the drop-down menu will increase when more sets have been identified.
- Entity type: this value is set automatically depending on the relation type. Valid entity types will be displayed in black, while invalid entity types will be displayed in red. In the example shown in the figure above, the Subject is a Protein and the Object is a Gene because the selected relation type is Prot2Gene: involved in regulation of.
- Entity name: this text field will only be enabled when Entity is selected at the corresponding dropdown menu. In the example, only the Subject is set to Entity, which enables the field for Node lookup only for the Subject.
In this field, users can write their protein, gene, etc of interest to find it in BioGateway. Typing in the field will trigger an autocomplete search engine that will aid in the selection of the node of interest. Once found, just click on the node of interest to select it. - Relation type: this dropdown menu allows the user to select the type of relation between Subject and Object.
More lines can easily be added by clicking the Add Line button, whereas a line can be deleted by clicking on the trash bin icon on the right side of the line to delete. Furthermore, the Subject and Object can be swapped by clicking the swap button on the right side of the line to swap.
Creating Advanced Queries
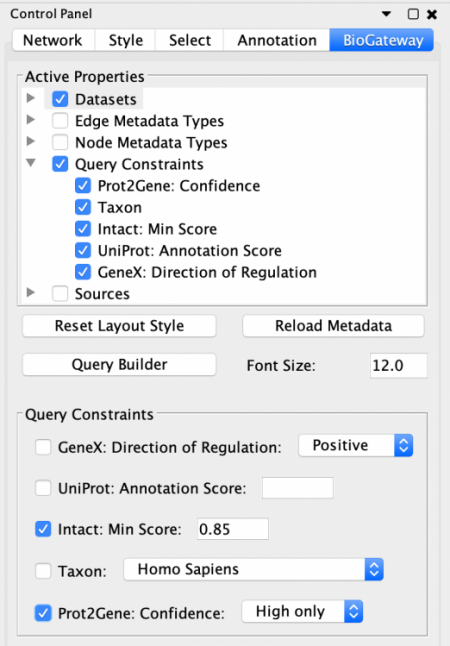
The BioGateway App offers the possibility of specifying in more detail the Active Properties and additional Query Constraints to create more advanced queries. This is done through the BioGateway tab in the Control Panel of Cytoscape.
To be able to specify Query Constraints, the user will need to activate one or more of the Query Constraint branch nodes of the Active Properties tree. This will display the Query Constraints section in the lower panel of the Control Panel. The next step will be to check the constraints of interest and set the value for each selected constraint. To understand the meaning of these values and how each score was computed, the user should visit the documentation for each of the resources.
After setting all the desired values, they are active for the next query that is run: simply open the Query Builder window, import or build a query and run it. The results of the query will be filtered according to the set parameters.
It is worth noting that creating advanced queries can be a trial and error process that needs some tweaking until a satisfactory set of parameters is found.
The Exclude self-loops Setting
When creating a query in the Query Builder, the option Exclude self-loops will be on by default, as this better reflects the logics behind the query building. In addition, we have also experienced that allowing self loops in some cases significantly increases the number of results, so the default setting safeguards against that.
The Exclude self-loops option forces the different Sets specified in the query to be disjunct, meaning not overlapping with each other (e.g. Set A and Set B will never contain an instance of the same entity). However, in Biology there are many cases where self-loops are important to consider, for instance, when a protein forms a homodimer to be able to perform its function. This specific case would be depicted as a self loop in BioGateway, and is not part of the results when the Exclude self-loops option is enabled.
We recommend that once a query yields interesting results, a comparison is done with a network generated while disabling the Exclude self-loops option.
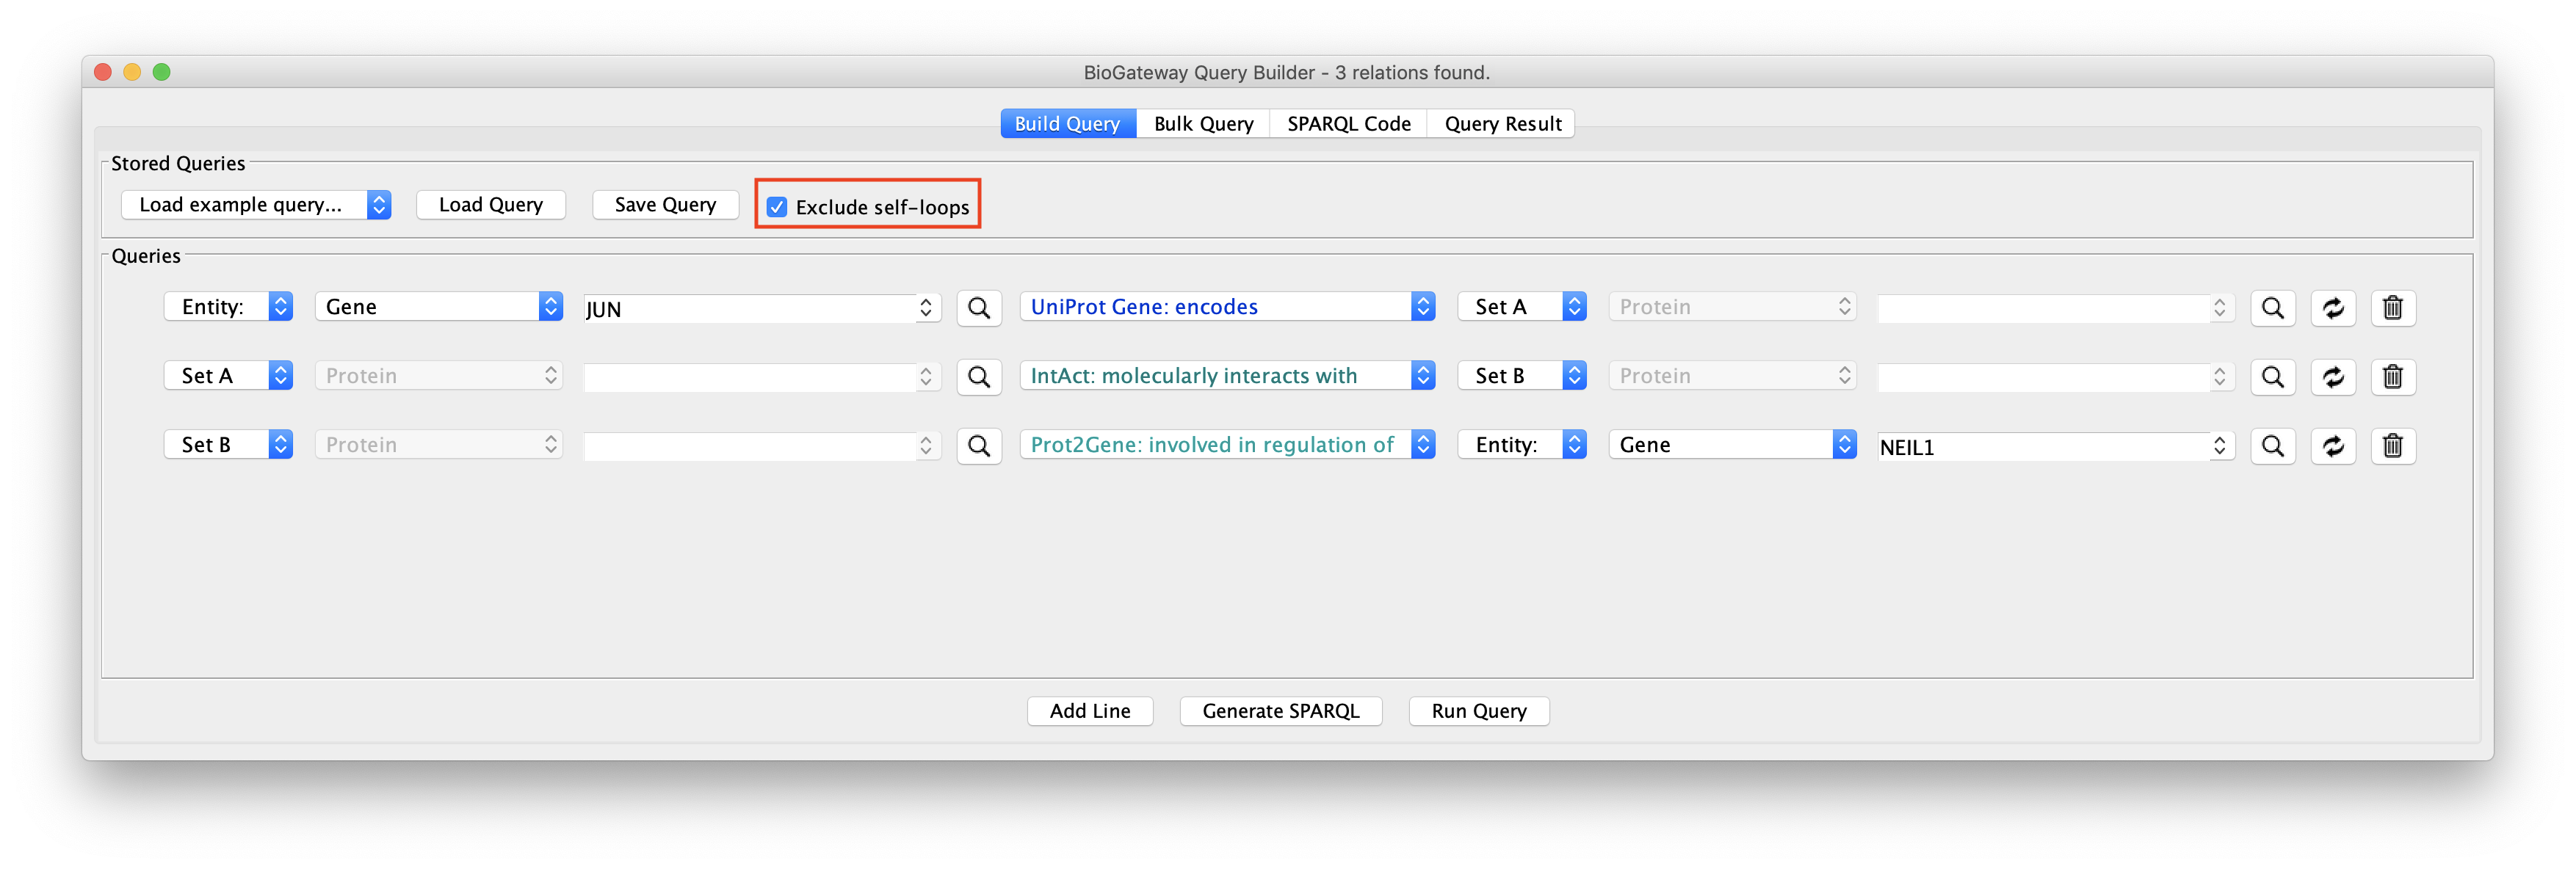
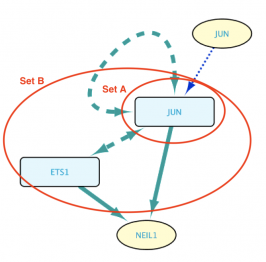
The image above displays an example query to showcase the function of this feature. Line 1 asks for the Protein encoded by the JUN Gene. Thus, Set A will only contain the Protein JUN. Line 2 asks for a Set B containing the Proteins interacting with Set A (JUN). Finally, line 3 restricts the Proteins in Set B to only those involved in the regulation of the NEIL1 Gene Expression.
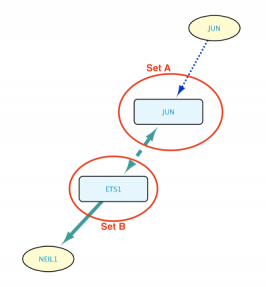
Exclude self-loops option enabled
In this case, the intersection between Sets A and B will be discarded from the results. This means that Set B can not contain JUN. The image below shows the resulting network.
Exclude self-loops option disabled
In this other case, the intersection between Sets A and B is allowed to be part of the results, meaning that Set B contains JUN, which is subsequently taken into account when searching for genes regulated by Set B members. The resulting network can be seen in the image below.
Saving/Loading queries
The Load example query box of the Stored Queries section of the Query Builder (below) contains several saved queries that can be loaded for demonstration and exploration purposes. The Load Query button allows a user to load previously saved queries, and the Save Query button allows saving a newly built query for future use.
Saving queries
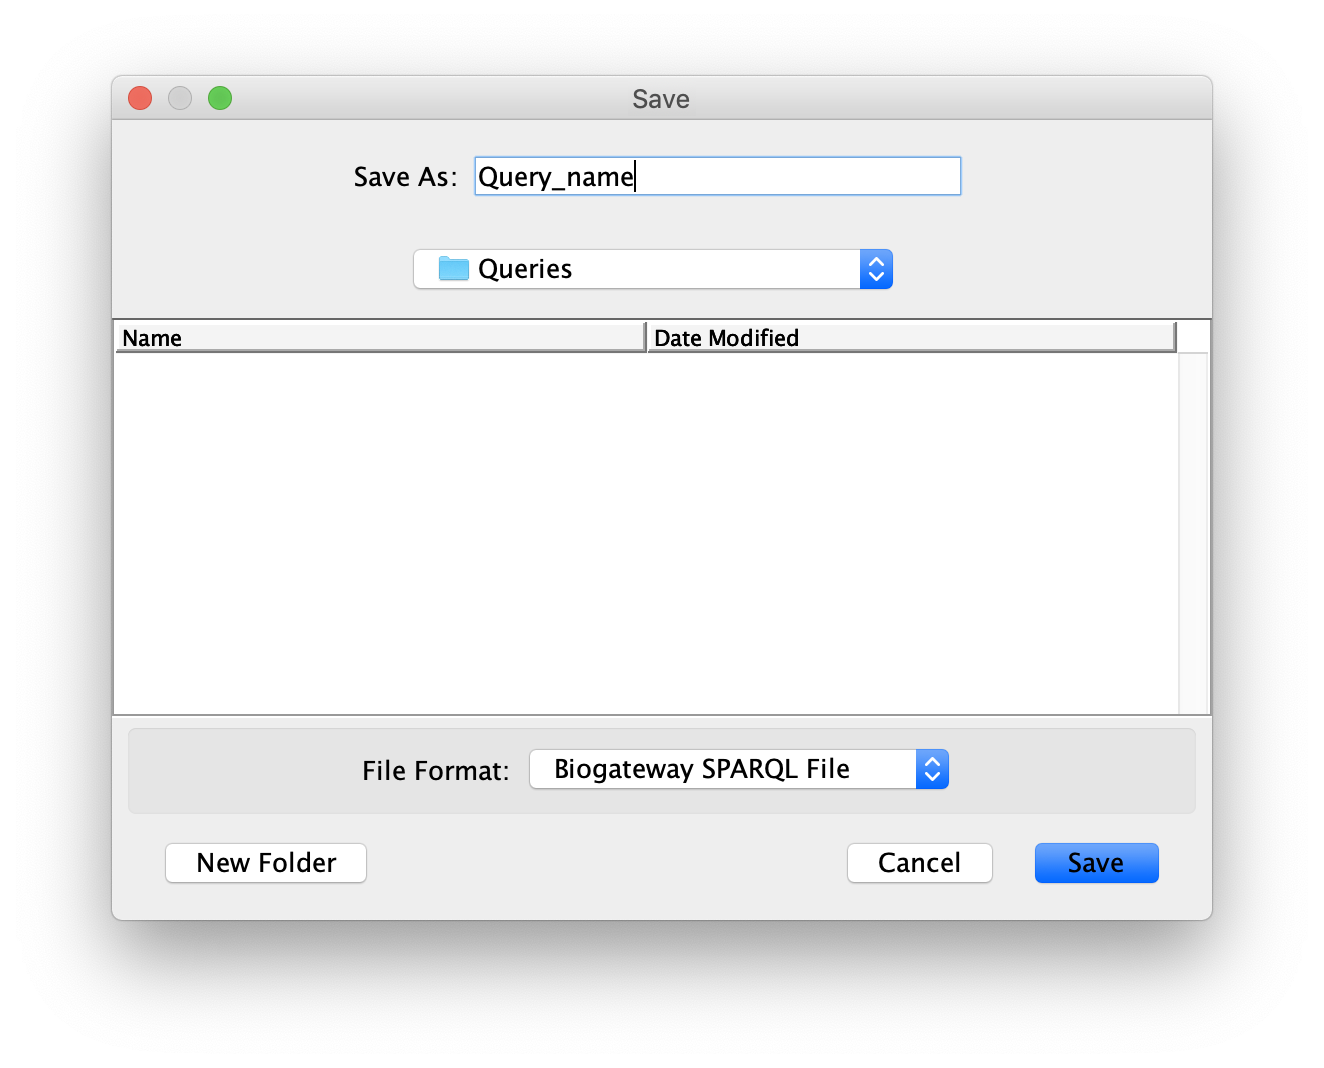
A query can be saved in a file once it has been built in the Query Builder. Click on the Save Query button. This will open a dialog that allows the user to select the directory where to store the query, as well as naming it as a .bgwsparql file. When having decided the name of the file and the directory where to save it, click the Save button to save the query.
Loading queries
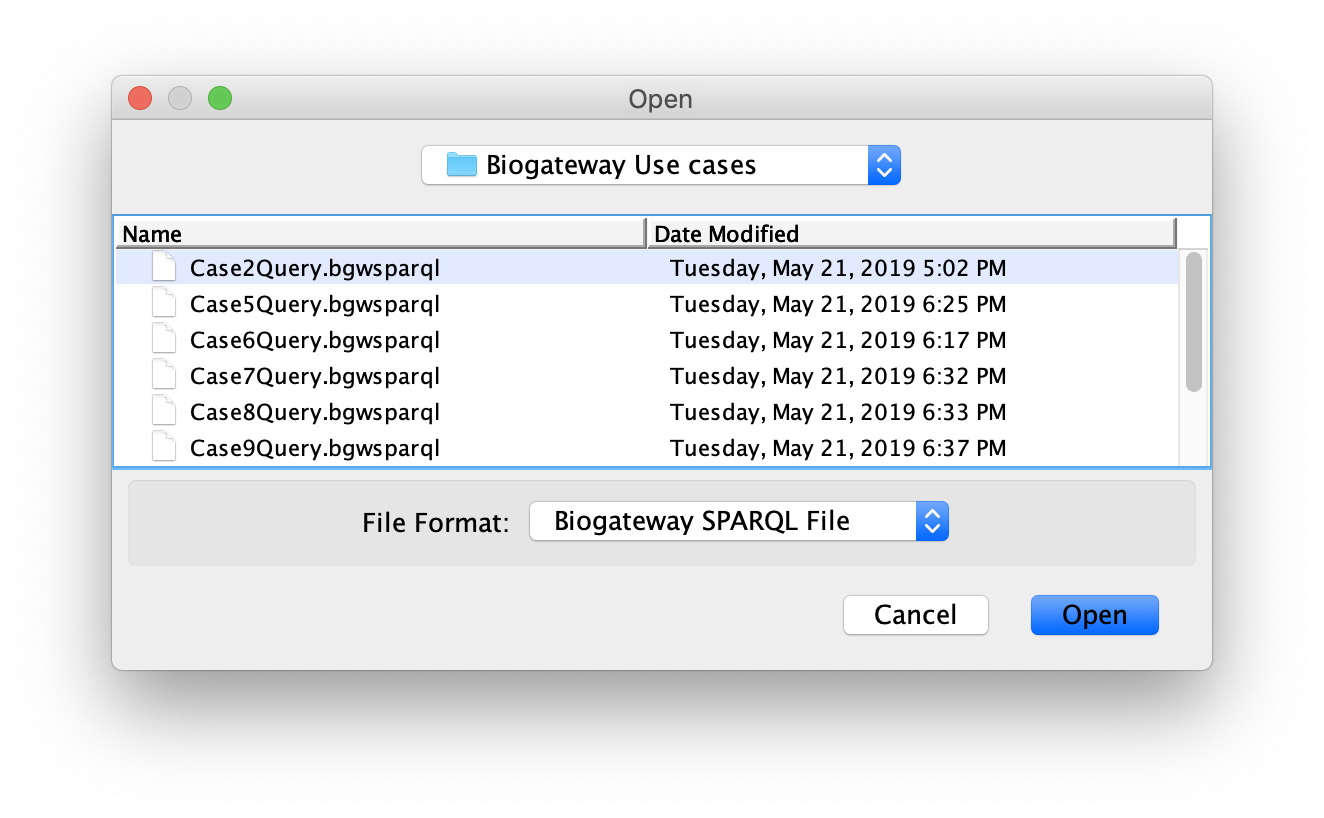
A previously saved query can be loaded by clicking the Load Query button. This will open a dialog that will allow the user to navigate to the desired directory and select the query of interest. After finding the query to load, select it and click on Open.
The SPARQL behind the scene
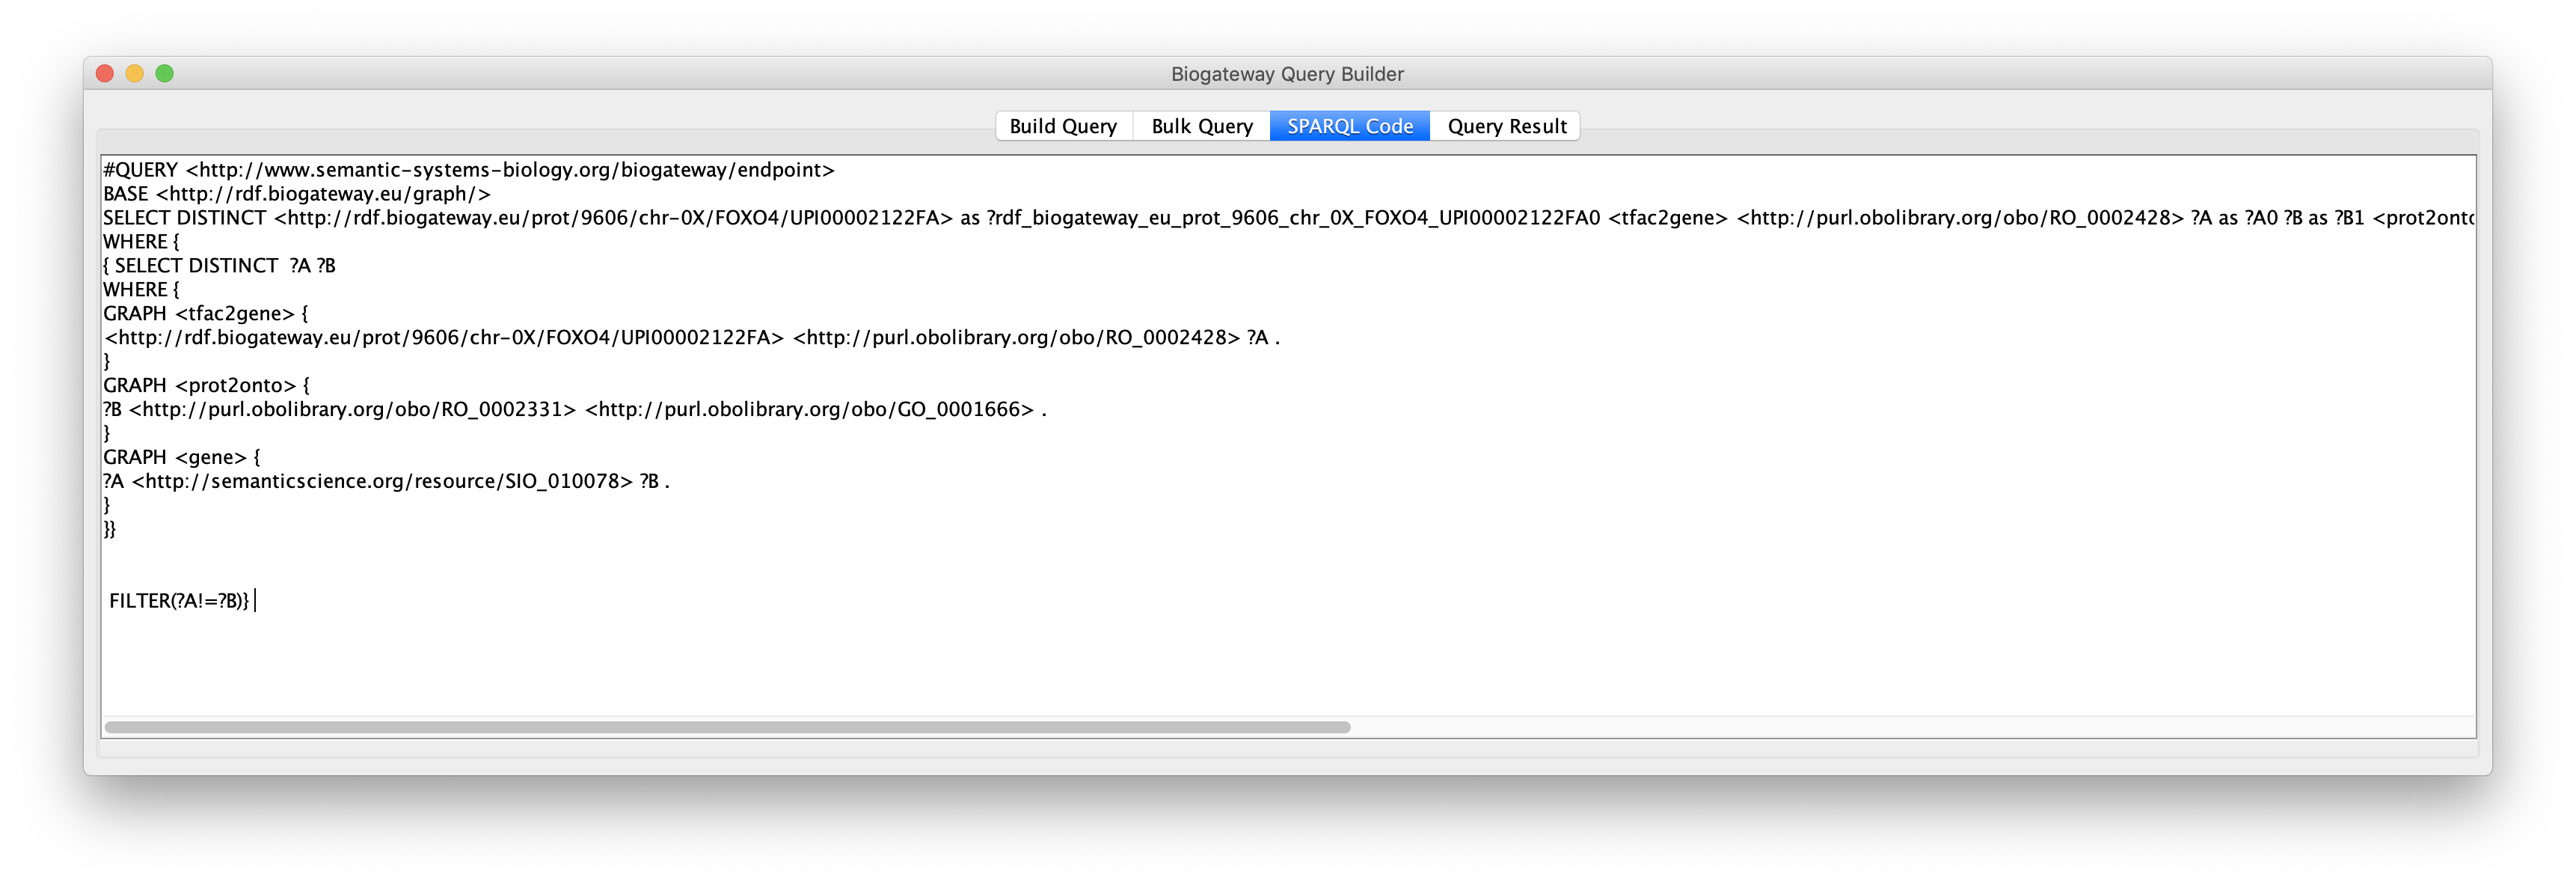
In some cases the user might want to extract the SPARQL code for the query built in the Query Builder. This can easily be done by clicking the Generate SPARQL button right after having finished building the query.
This will redirect the user to the SPARQL Code tab of the Query Builder window, where the complete code that has been generated is displayed.
Query Builder Results
A query in the BioGateway Query Builder is launched to the server once the user clicks the Run Query button. Once all the results are found, the Query Builder window will show the Query Result tab, where the results are displayed and can be inspected prior to selection and importing them to a Network in Cytoscape.
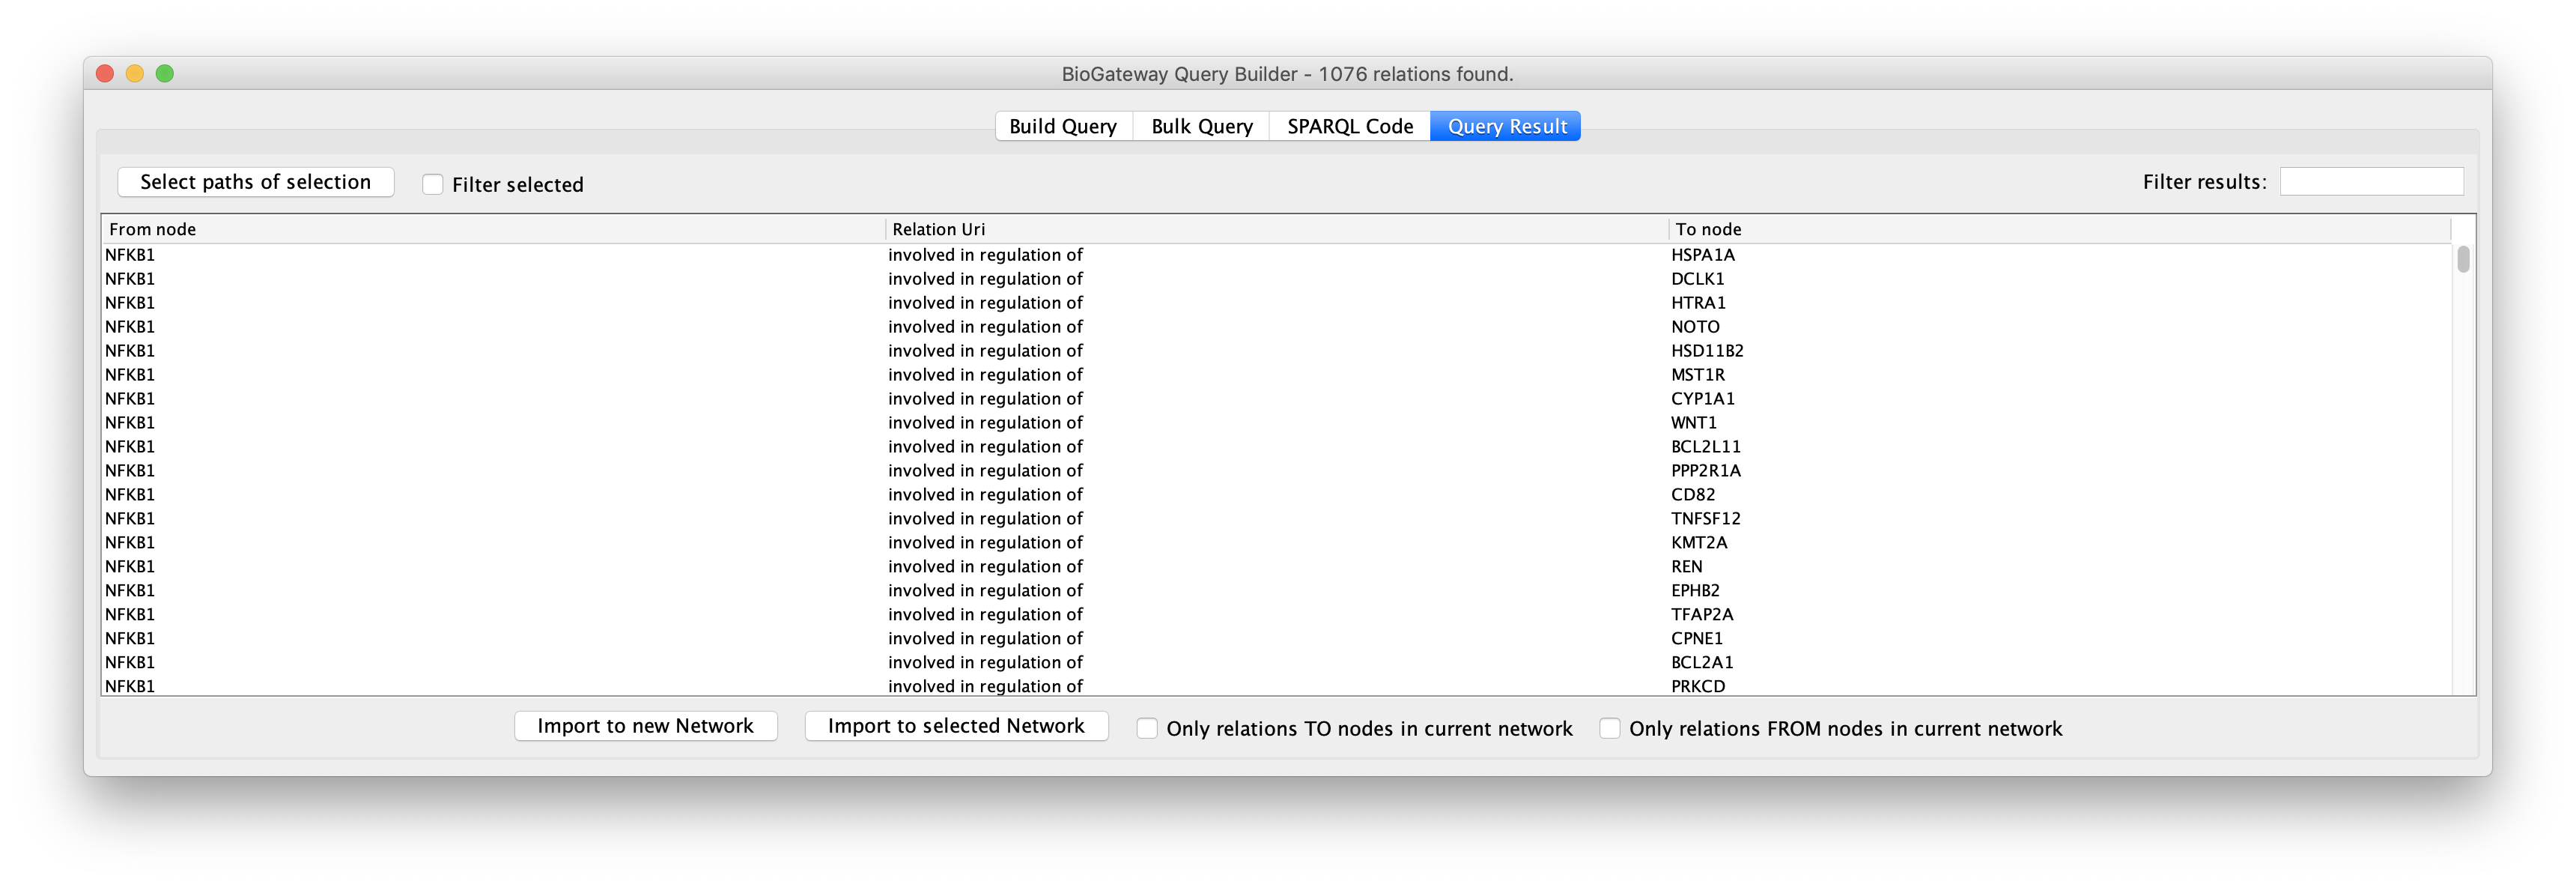
The Query Result tab offers the user the option to select all, or only a subset of the results to be imported as a network. Specific results can be selected by Ctrl/Cmd + click the rows of interest and/or Shift + click the rows of interest. Alternatively, all results can be selected simply by using Ctrl/Cmd + A. Next, the selected results can be imported to a network in Cytoscape by clicking the Import to new Network (to import the selected results to a new network in the Cytoscape session) or Import to selected Network buttons (to import the selected results to the currently active network in the Cytoscape session).
The selection of subsections of the results can be further facilitated by sorting on the different columns in the results. Also, the Filter selected checkbox will hide all unselected rows to ease reviewing the rows to import.
Filter results based on nodes in selected network
When using the Query Builder to find new nodes to add to an existing network, it will often be useful to restrict the results to be connected to some of the nodes already present in your selected network. The Query Builder Result panel includes two check-boxes for this purpose.

Selecting either check-box will limit the new results to relations with nodes already present in an active network.
Only relations TO nodes in current network
Checking this box will filter the result list to only show the relations where the target node (right-most column) is present in the currently selected network.
Only relations FROM nodes in current network
Checking this box will filter the result list to only show the relations where the source node (left-most column) is present in the currently selected network.
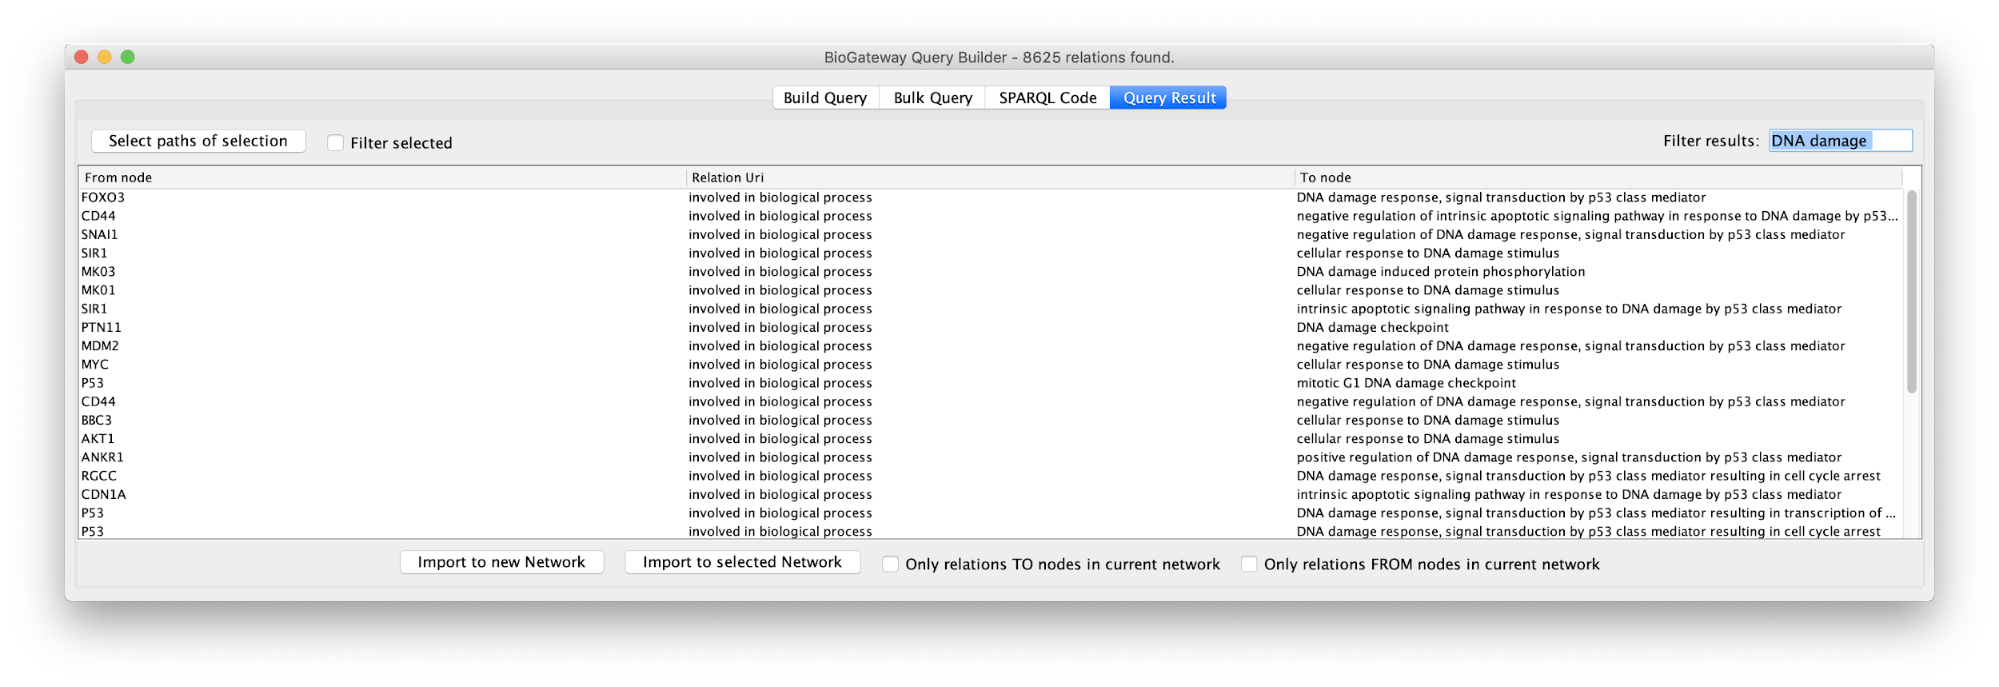
Text Filtering
Sometimes queries will produce a challenging number of results. A text filtering function is designed to ease the process of finding specific results in the Query Result tab. In the Filter results box located in the top right corner of the Query Result window, the user can write a text of interest to filter results by. Results that match the introduced text in any of the columns will be selected. This can significantly reduce the number of result lines displayed in the Query Result window, allowing a user to home in further to the results of interest.
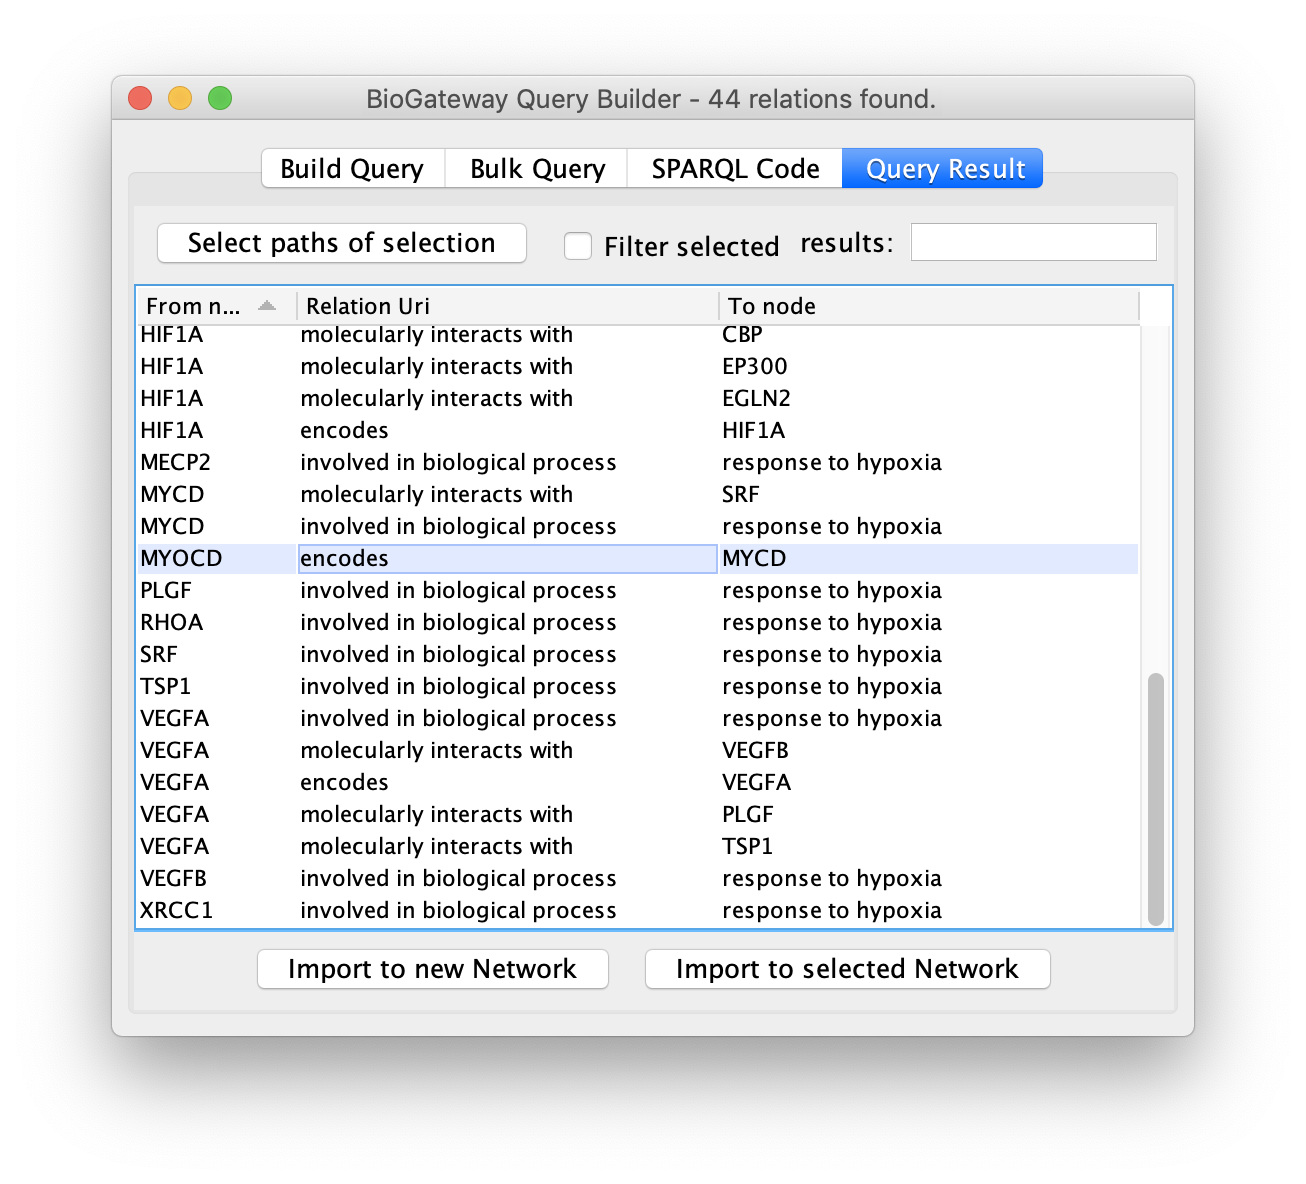
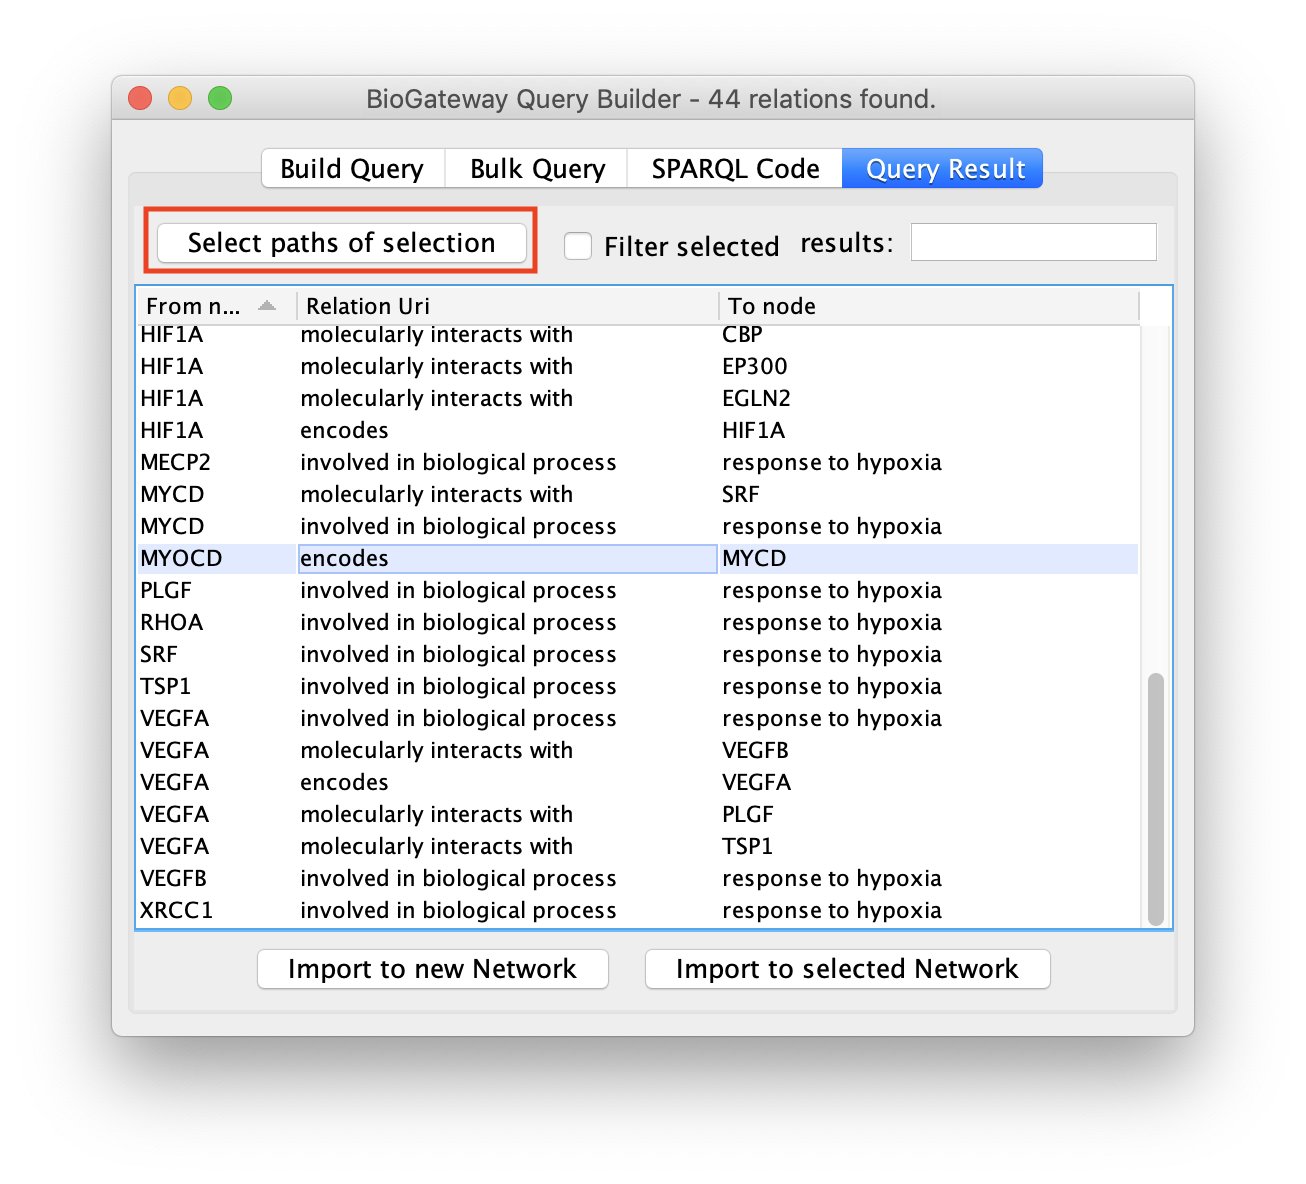
Select Paths
When a query retrieves a large number of results it can be useful to import only a subset of these. As explained previously, the user can select one or multiple rows by clicking on them. However, it can be useful to also include all the nodes and edges leading to the selected rows. The Select paths of selection button allows the user to automatically find all nodes and edges in the results that mark a directionality to the rows that have been selected by the user.
To do so, first select the rows of interest in the Query Result tab.
Next, click the Select paths of selection button to find all the results pointing to the selected rows.
All the results will be displayed again, but only the rows of interest will be selected.
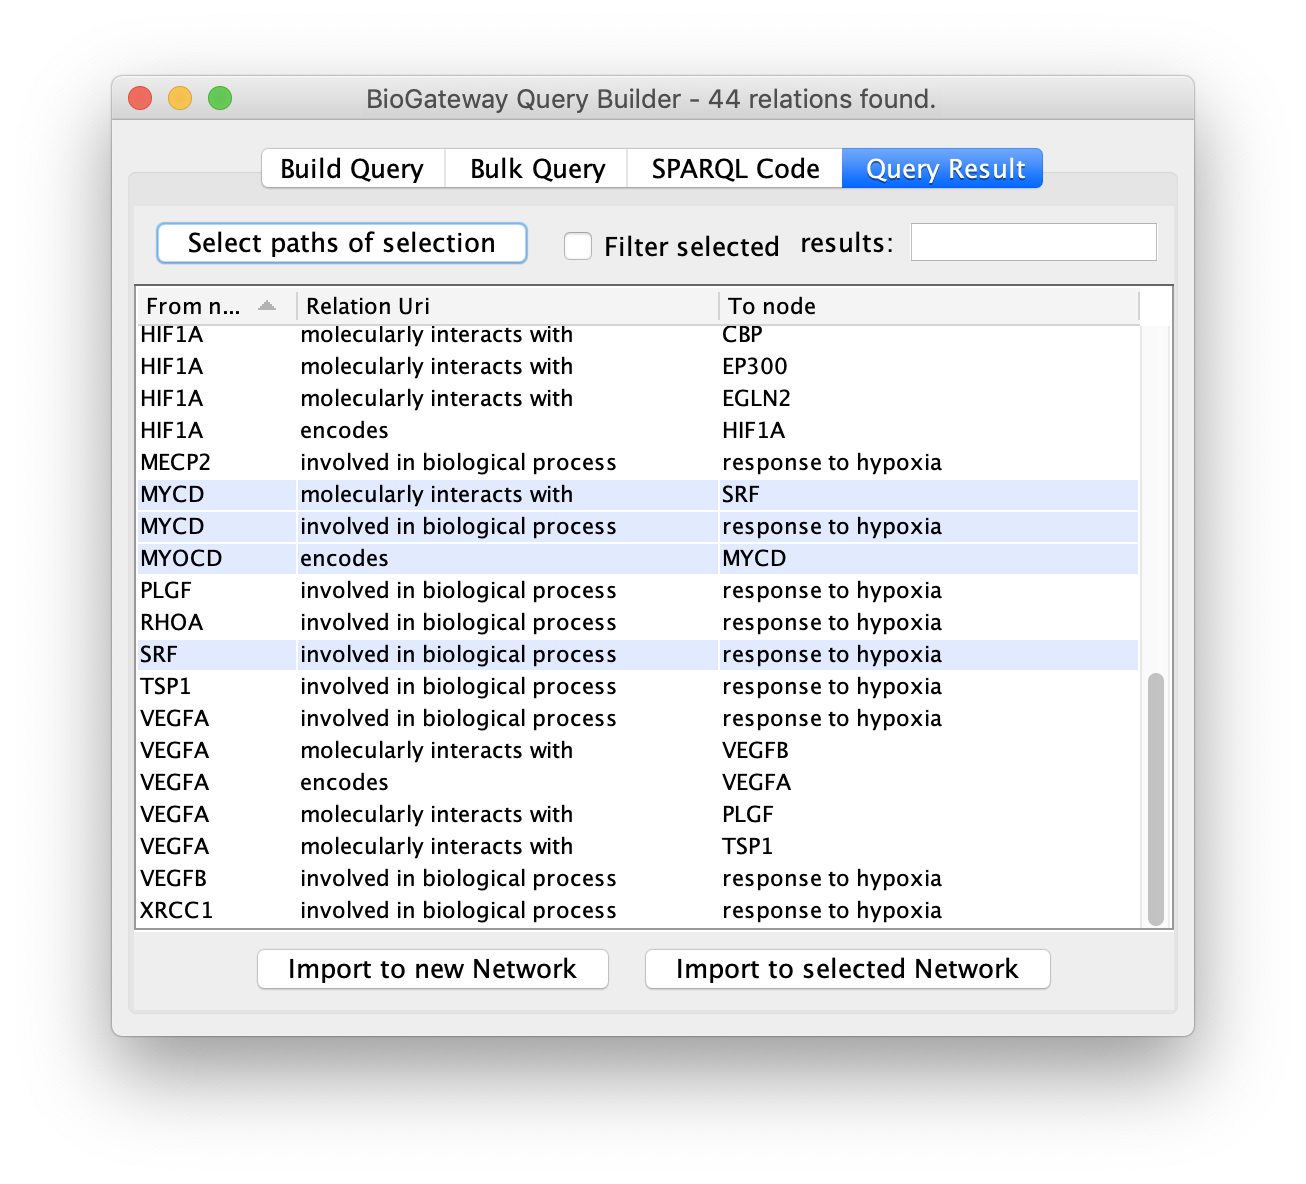
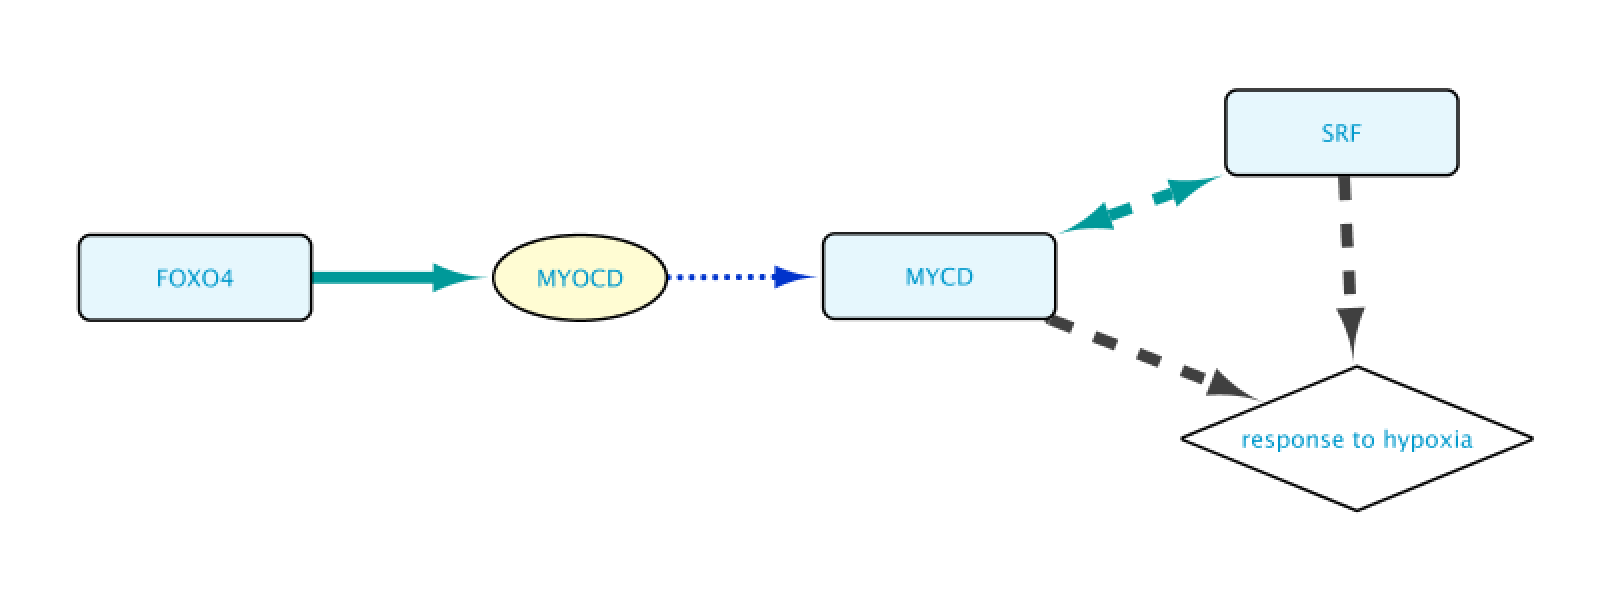
As a result, the user will get a network containing the nodes and edges leading to the row(s) initially selected in the Query Result tab of the Query Builder window.
Reviewing relations
Some types of relations such as Protein-Protein interactions or Transcription Factor-Target Gene interactions are derived from database resources and publications. When building a network it is important to know which resources support a relation and what the publications are behind that information. The BioGateway App offers the possibility to easily retrieve the provenance of these relations, allowing the users to assess the source of the data and decide if they want to keep or remove a relation from their network based on their own criteria. All this is done via a double click expansion of edges in a BioGateway network.
When interested in the background of the data supporting a specific relation in the Imported Network, the user will only need to double-click on the edge representing that relation. This will expand the edge, creating a new node that will represent that interaction. The new node can now be accessed by right clicking it, which brings up several options in a drop-down menu.
Going to the source of the data
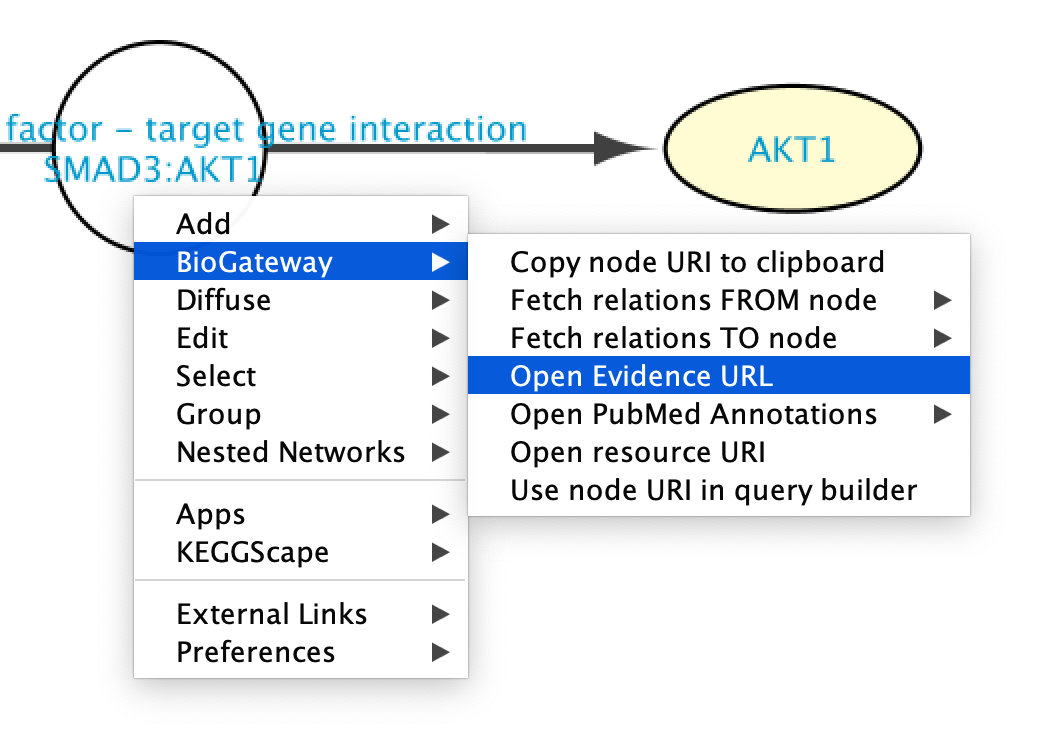
The original source of the data can be easily accessed by clicking on a node and selecting Biogateway > Open Evidence URL. This will open a Web Browser window leading the user to the resource supporting that interaction, allowing further exploration of the methods used to detect the interaction, etc.
Going to PubMed articles
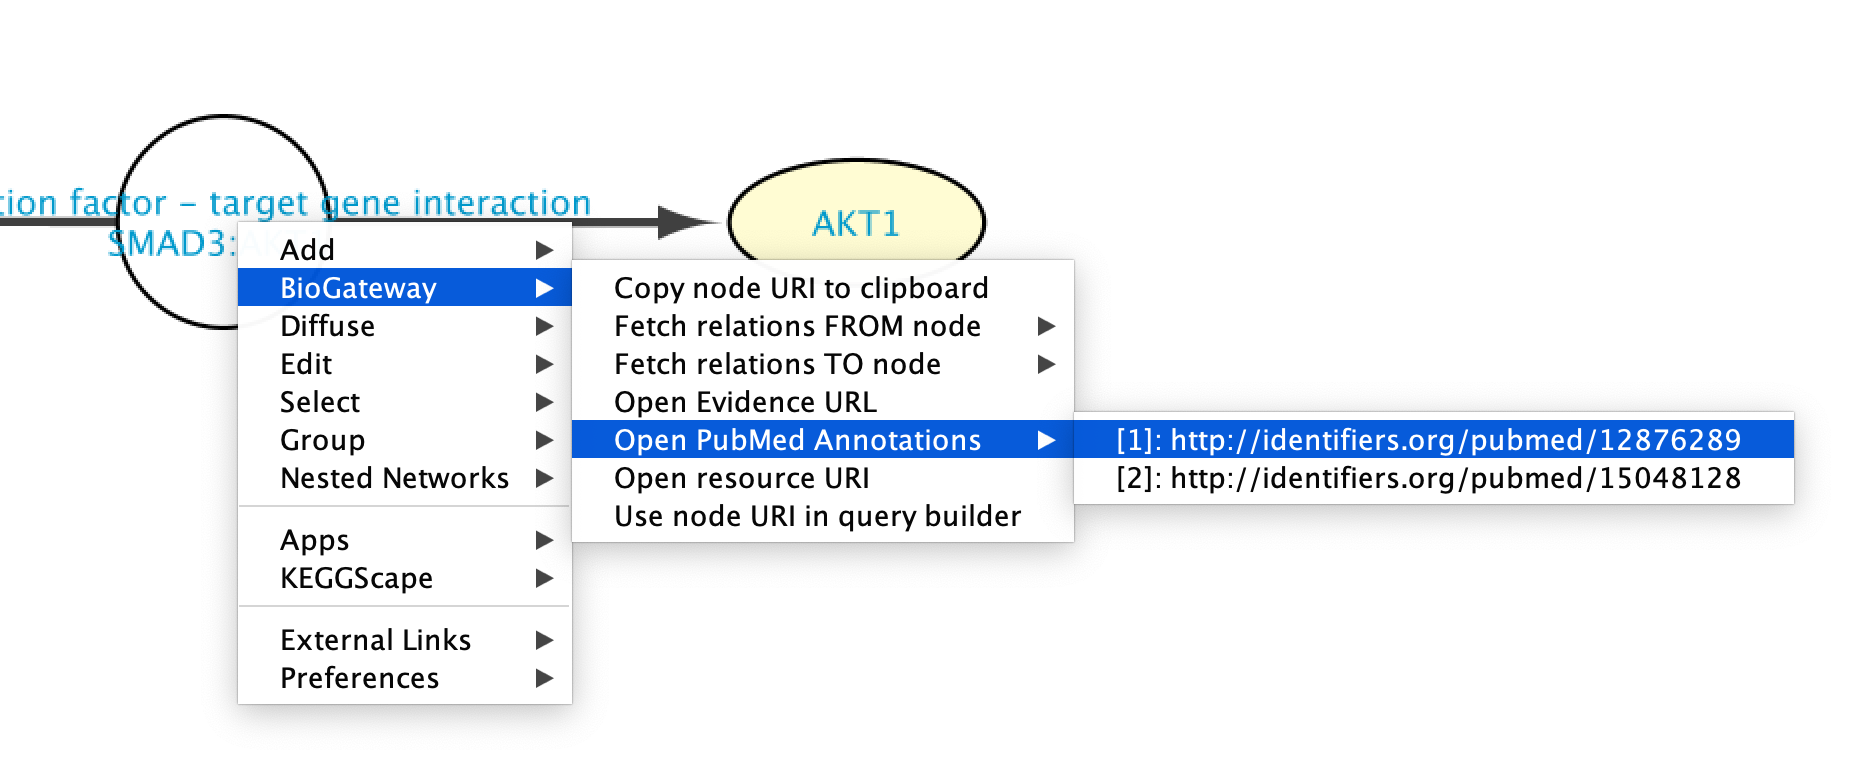
PubMed articles supporting an interaction can be accessed by right clicking the new node representing the interaction and selecting BioGateway > Open PubMed Annotations. This will display all the PubMed articles supporting that specific relation. When clicking on one of the articles, a Web Browser window will open redirecting the user to the PubMed page for the selected article.
Going to ‘Landing Pages’
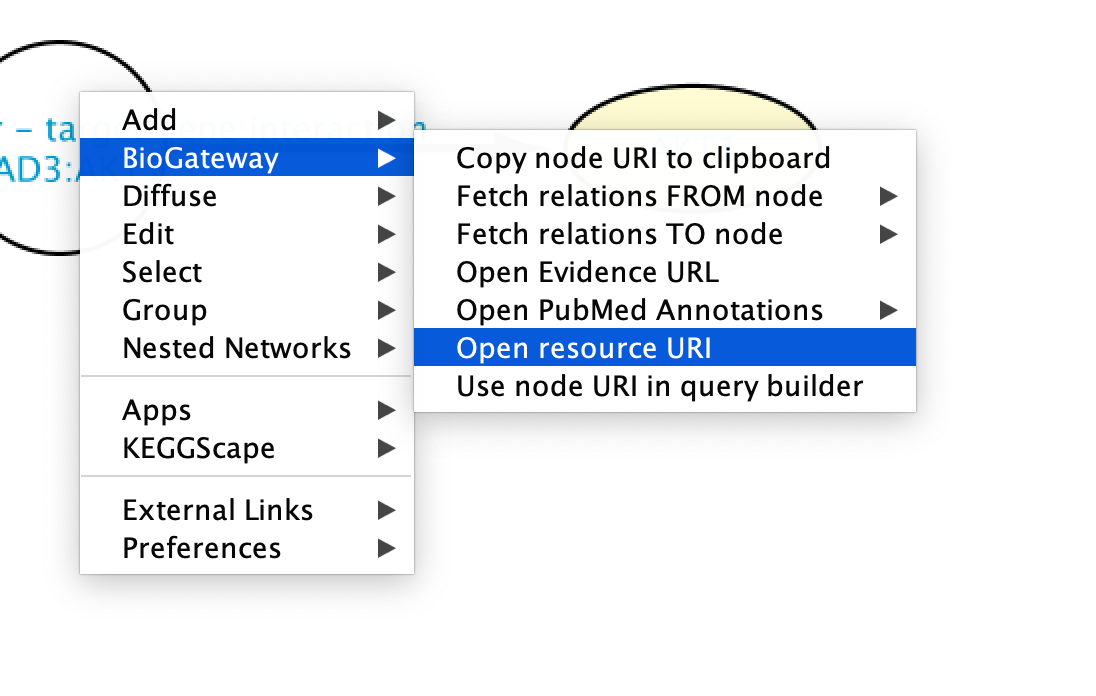
The Landing Pages contain all the information about each node in BioGateway. A Landing Page for a node can be accessed by right clicking on the node of interest and selecting BioGateway > Open resource URI. This will open a Web Browser window taking the user to the Landing Page for the selected node.
Metadata loading
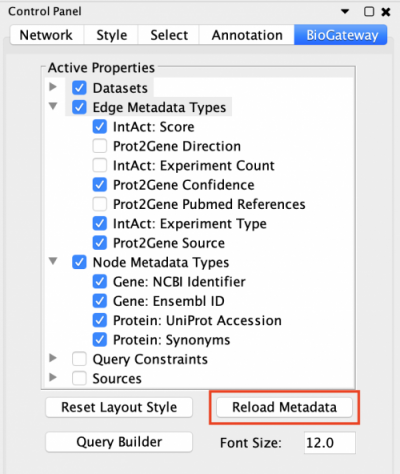
For performance purposes, the default is to only retrieve a subset of the available information when launching a query. However, the user can select to retrieve more data regarding nodes and relations. This is done by accessing the BioGateway tab in the Cytoscape Control Panel.
In the Active Properties menu that is displayed, Edge and Node Metadata Types branches to expand the different types of metadata that can be loaded. Select the desired metadata, and when completed, click the Reload Metadata button to add the requested information to the network. The information will be now available in the Attribute Table Panel of Cytoscape.
In cases where a network is very large, Metadata loading can take a cumbersome amount of time. If that is the case, the user may abort the action, uncheck some of the Metadata Types and click the Reload Metadata button.
Please note that any launched query will import the selected Metadata Types. Thus, it is recommended to make sure to uncheck the Metadata Types before importing any results, specially if the user is about to import a large network.
Bulk Query
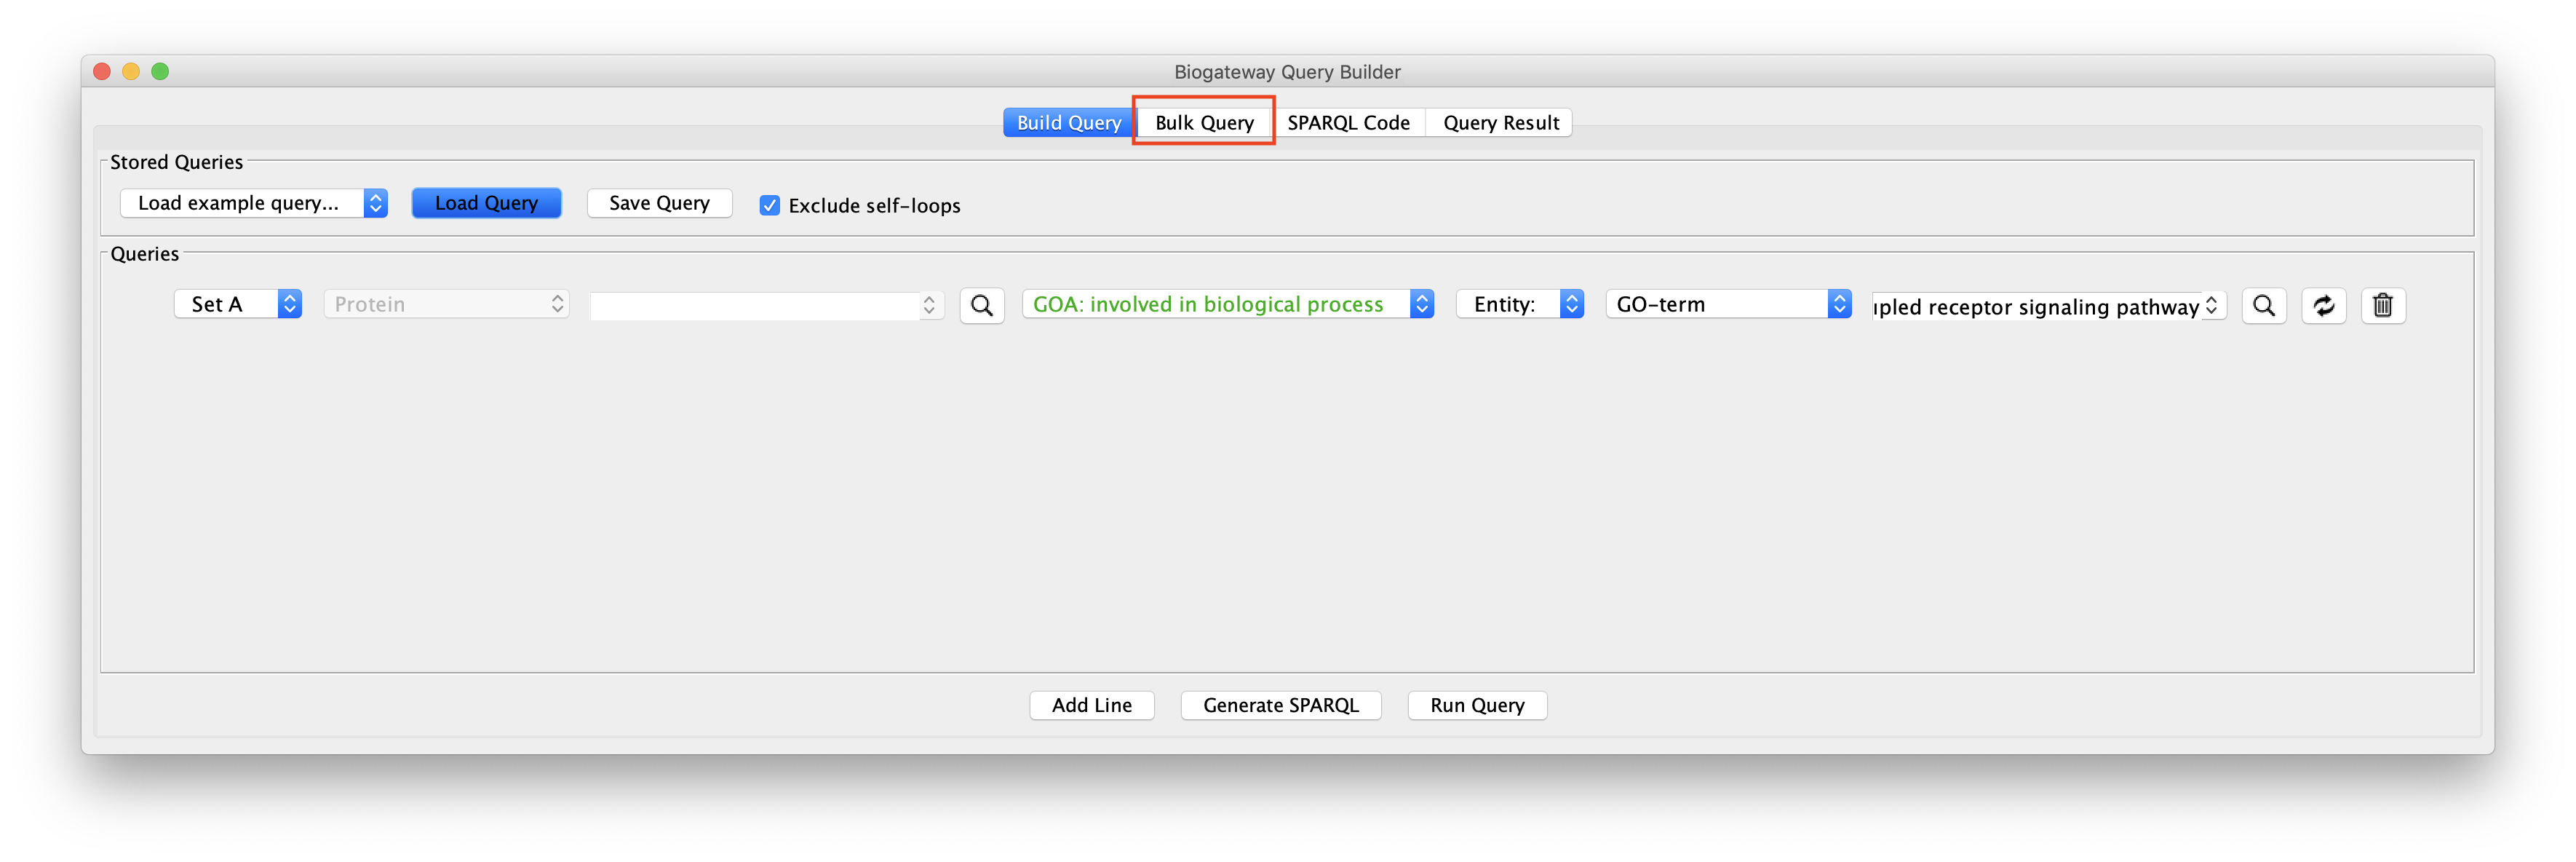
BioGateway also allows to perform explorative network building starting not from a single entity or query line, but by specifying several nodes simultaneously, for instance if a user is interested in extending a network that already was produced through other means in Cytoscape. The BioGateway App therefore supports the possibility of bulk import several nodes from an existing network in the Cytoscape Canvas.
By activating the Bulk Query Import tab in the Query Builder window, the query window below opens.
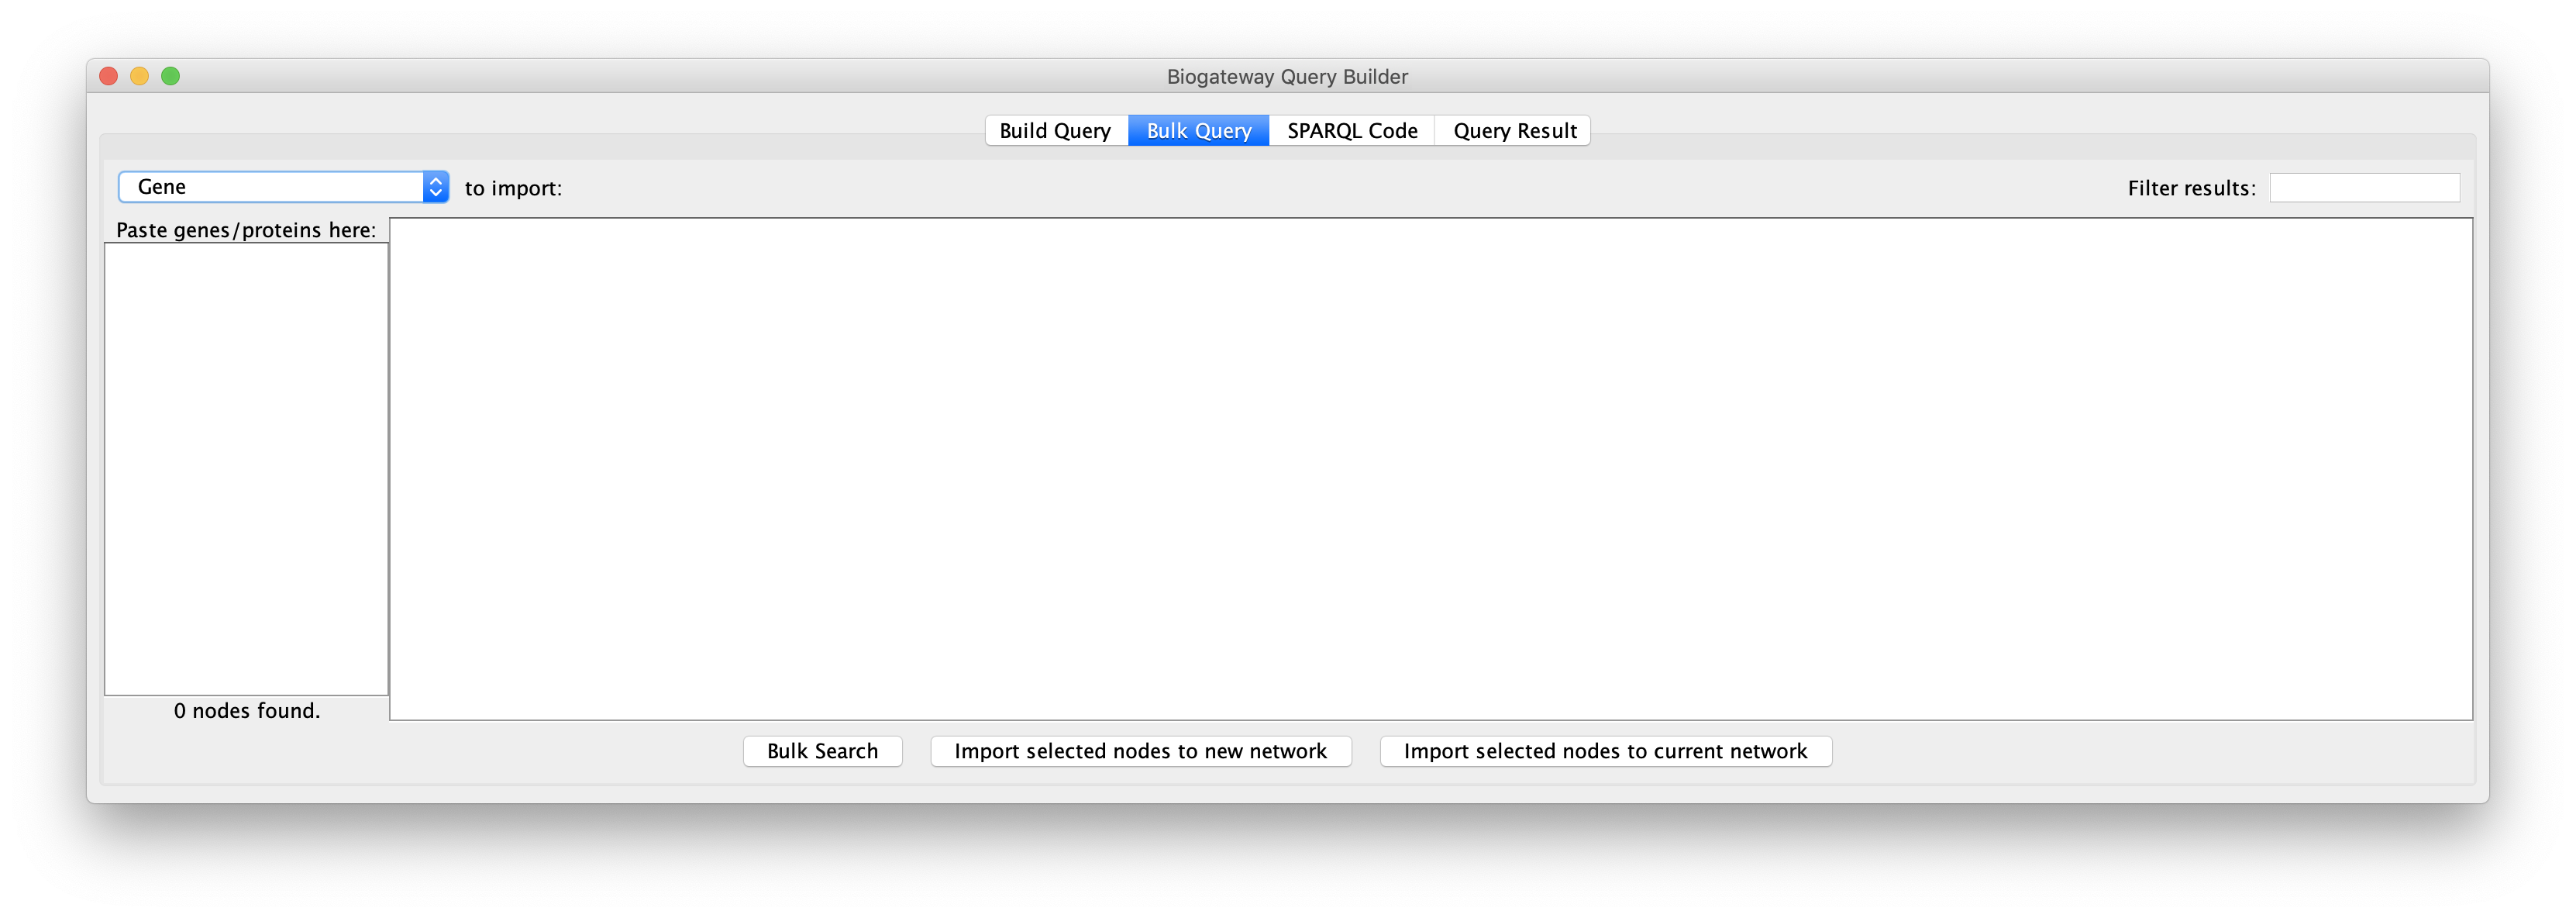
For a bulk query, enter or copy a list of names genes/proteins in the field on the left, each entry separated by a new line. The drop-down menu in the top left corner allows to select the identifier type of the entered entities. Please note that the tool only supports the search of one type of node at a time (Genes or Proteins). Thus, make sure that the desired node type is selected before importing. The supported identifier types are Gene Name, Protein Name, Uniprot Accession, ENSEMBL ID and Entrez ID.
Next, click the Bulk Search button to run the search and display the results. Results can be filtered with the Filter results tool in the top right corner. This tool works exactly in the same way as described in the Query Result section of the Manual.
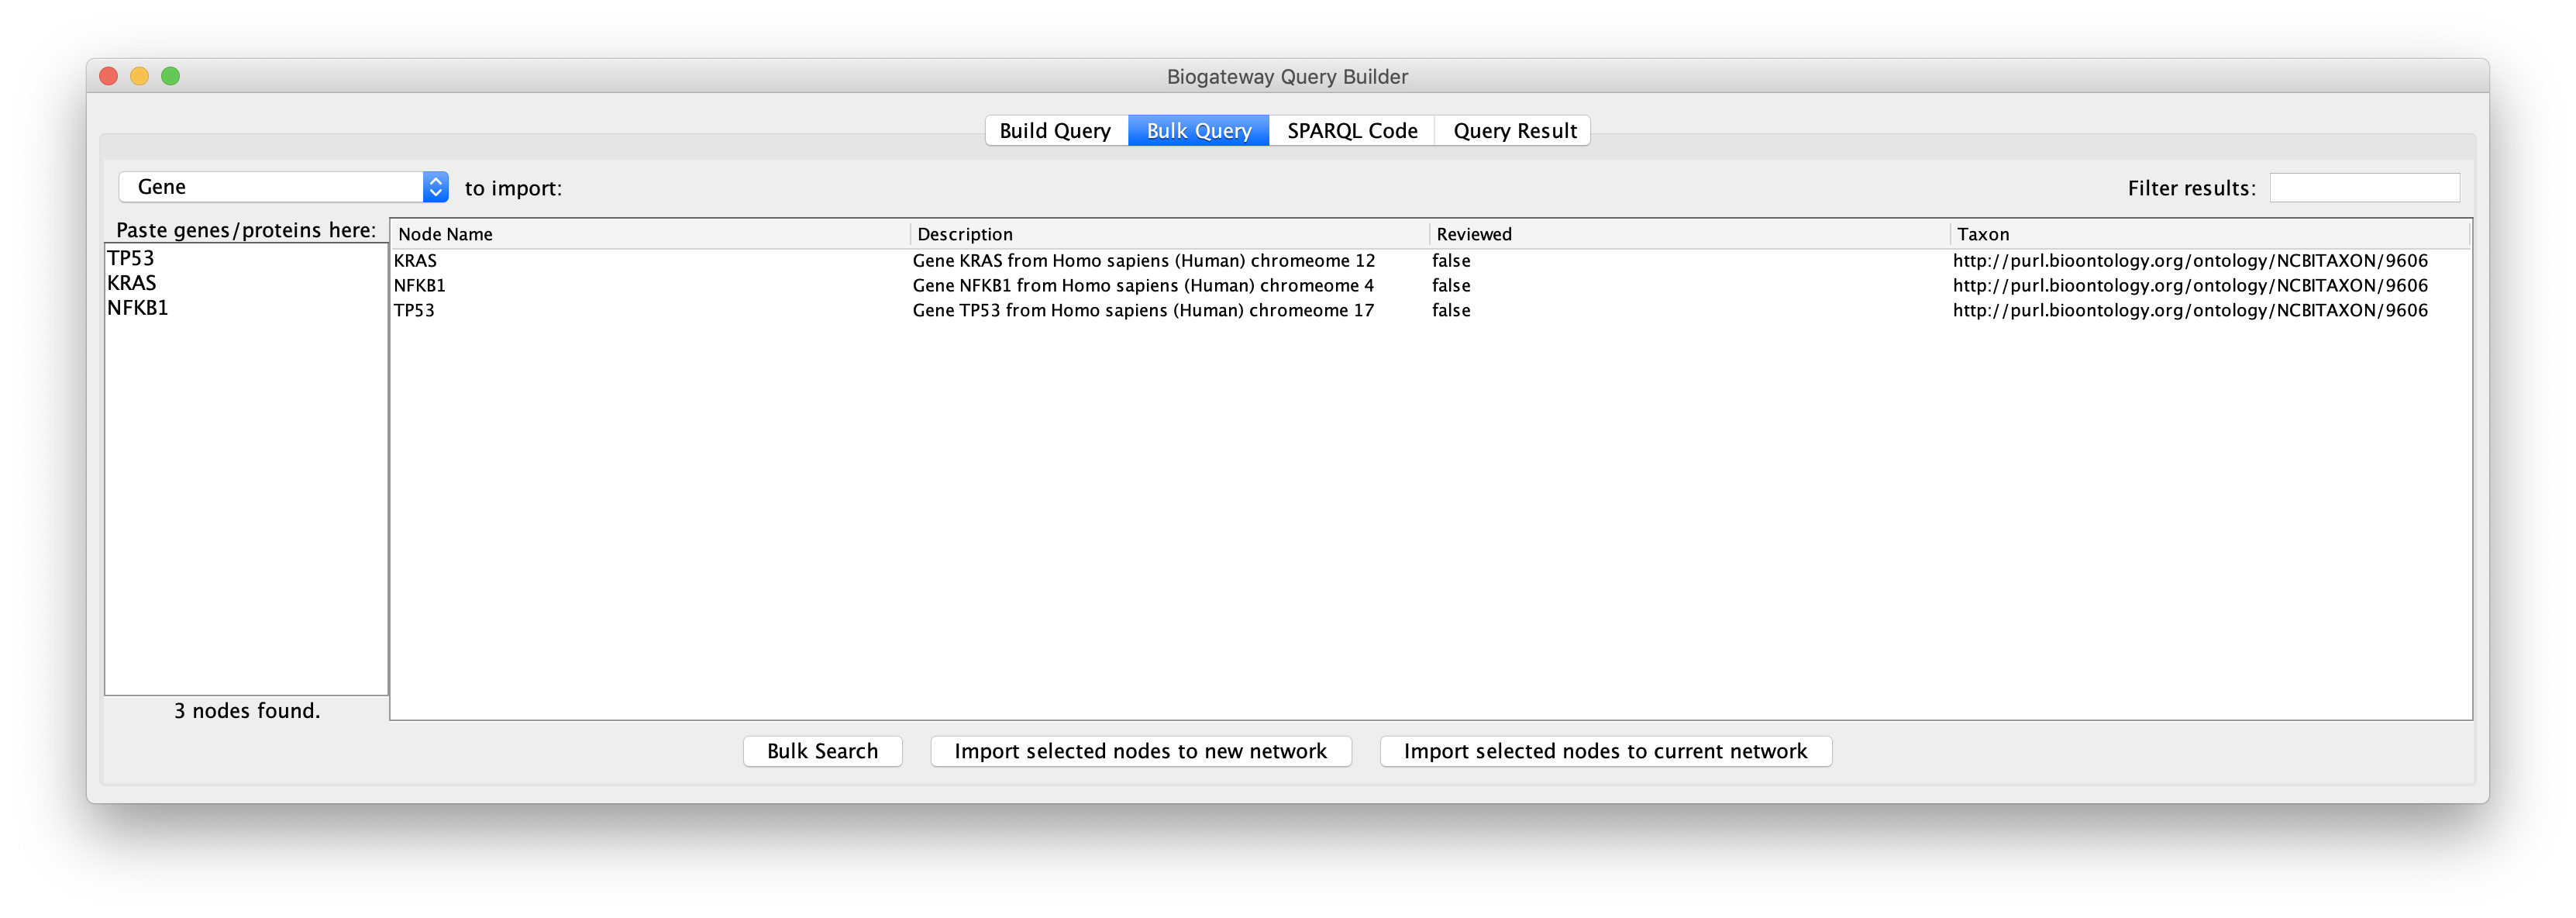
The user can now select the results of interest and load them in a new network or to a current network by clicking the appropriate button below the results window.
It is important to remember that BioGateway represents proteins and genes as two different types of nodes. This means that if the user selects Gene as the node type to import, the results will be imported as genes, while they will be imported as proteins if Protein is selected.
Right Click Queries
Besides using the Query Builder, the user can also run simple queries by right-clicking on a node in the Cytoscape Canvas. This is equivalent to a one line query in the Query Builder, where the Subject/Object would be the node that is being right-clicked. Furthermore, it is also possible to select a group of Nodes and create a query where all the selected nodes are being used as Subject/Object. In the Query Builder, this would be equivalent to a query where each line is representing one of the selected nodes.
The right-click functionality also allows the import of nodes to an empty or existing network. Thus, this tool enables the user to either start from scratch a new network or expand an existing one by exploring the different possible relation types that BioGateway offers.
Adding nodes
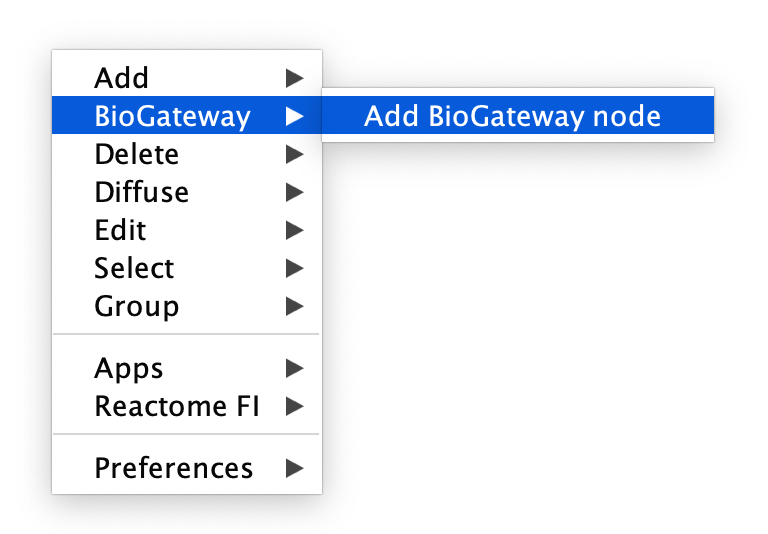
To add nodes to an empty or existing network, right-click anywhere in the Cytoscape Canvas and select BioGateway > Add BioGateway node.
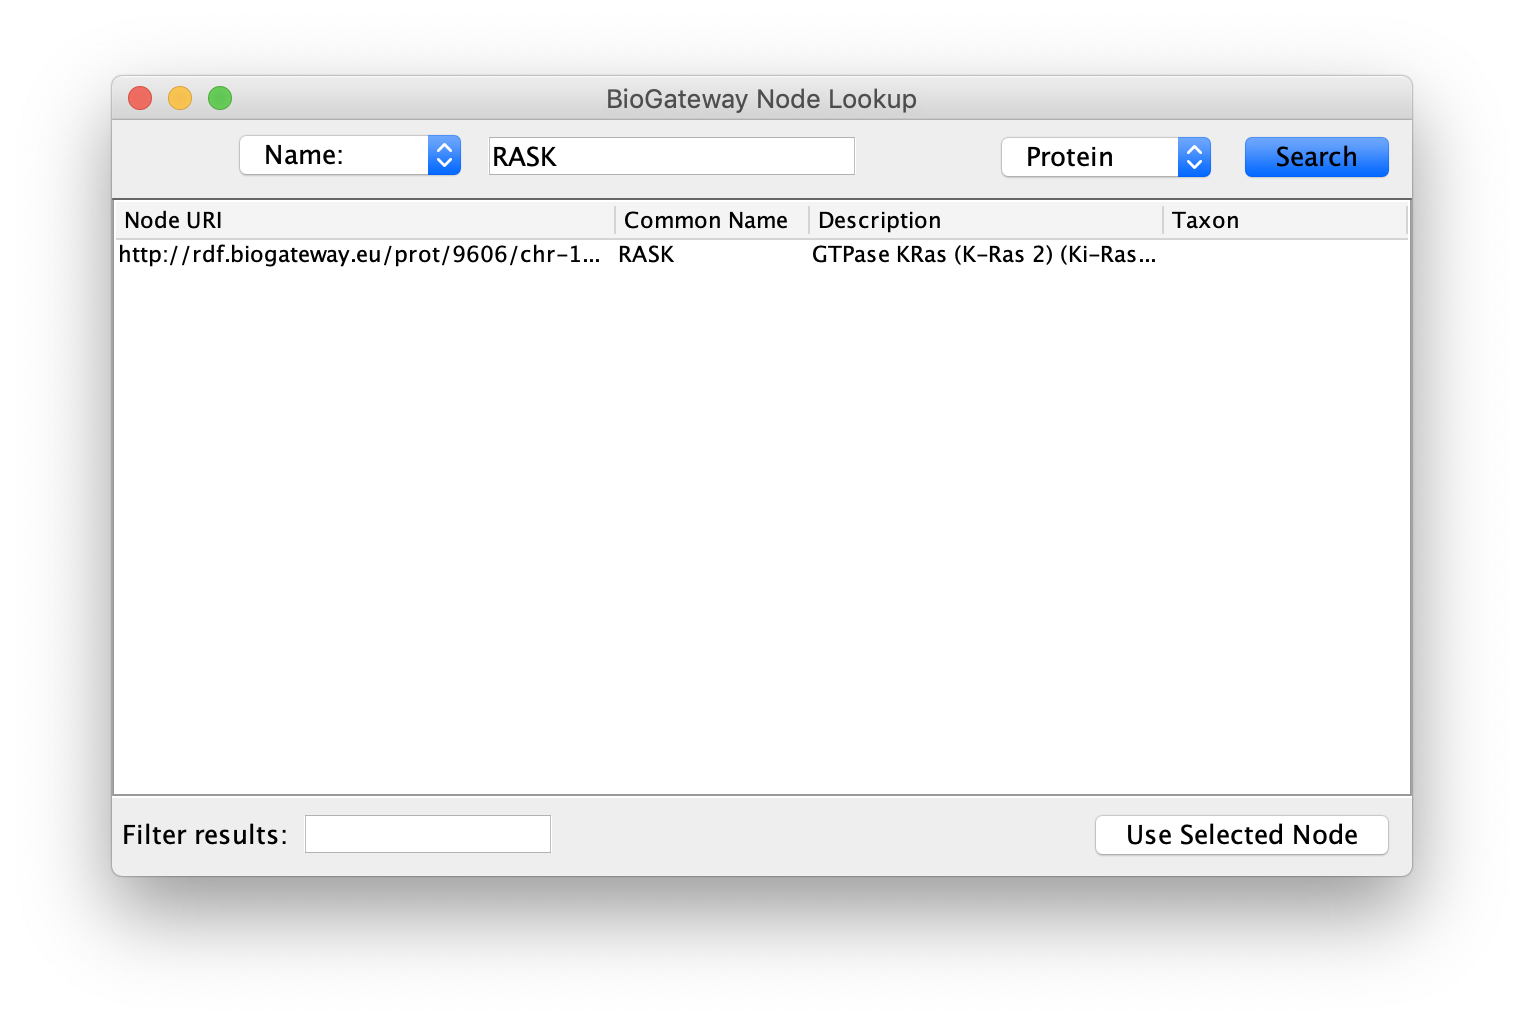
This will open a dialog where the user will have to select a node of interest. First, select the type of identifier that should be used, from the possibilities Name, URI, UniProt ID and GO-Term displayed in the top left dropdown menu.
Next, specify the identifier in the text field at the top center of the window. To following step will be to select the type of entity, which is done at the top right dropdown menu. The options in this case are: Protein, Gene, GO-Term, Taxon and Disease.
Once completed, click the Search button to run the query. If the query contains any results they will be displayed in the window. In case of multiple results, the user can filter them by using the Filter results text field in the bottom left corner, or by sorting the columns. The filtering tool and the sorting works in the same way as the filtering tool described in the Query Builder Results section.
Finally, select the node or nodes to import and click the Use Selected Node button to import them into the currently selected Network.
Running queries on the nodes in the network
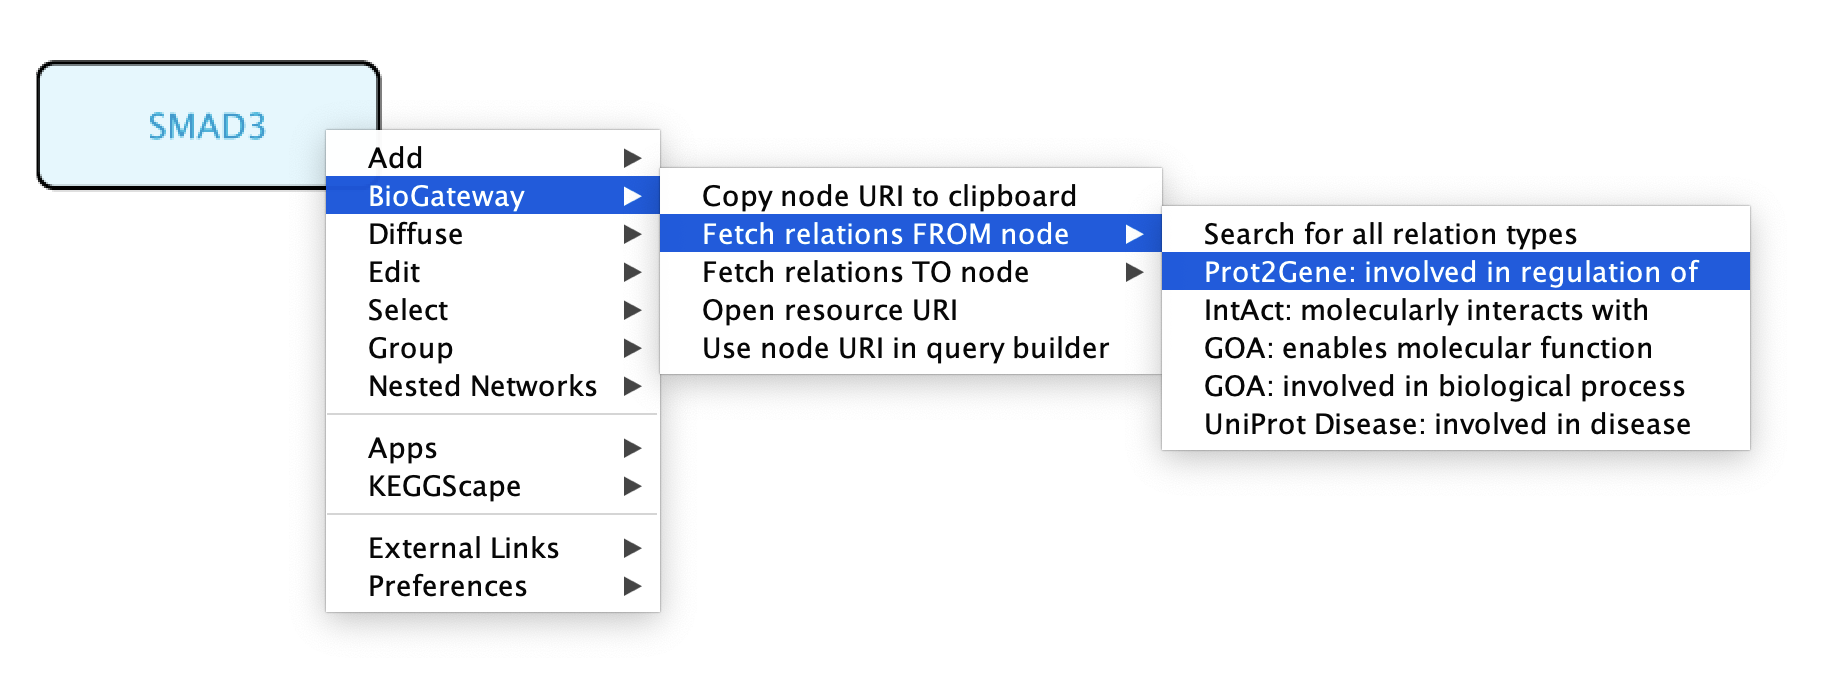
As mentioned previously, the right-click feature of the BioGateway App allows to quickly run queries using selected node/s as Subject/Object. To run queries on one specific node, right-click the node of interest and select BioGateway > Fetch relations FROM/TO node > select the relation type. If the user wants to use the selected node as Subject, select Fetch relations FROM node. Likewise, if the selected node is the Object of the query, select Fetch relations TO node. The available relation types will depend on the type of node that is being selected as well as on the selected node being the Subject or the Object of the query. Alternatively, the user can also select Search for all relation types to fetch all possible relations FROM or TO the selected node.
Clicking on one of the possible relations will trigger the query, which will open a new window displaying its results. Here, the user can select all or a subset of the results and import them into the current network by clicking the Import Selected button. BioGateway also offers the possibility to import only the relations from the results that involve any of the nodes present in the current network. This is done by simply clicking the Import relations between existing nodes button.

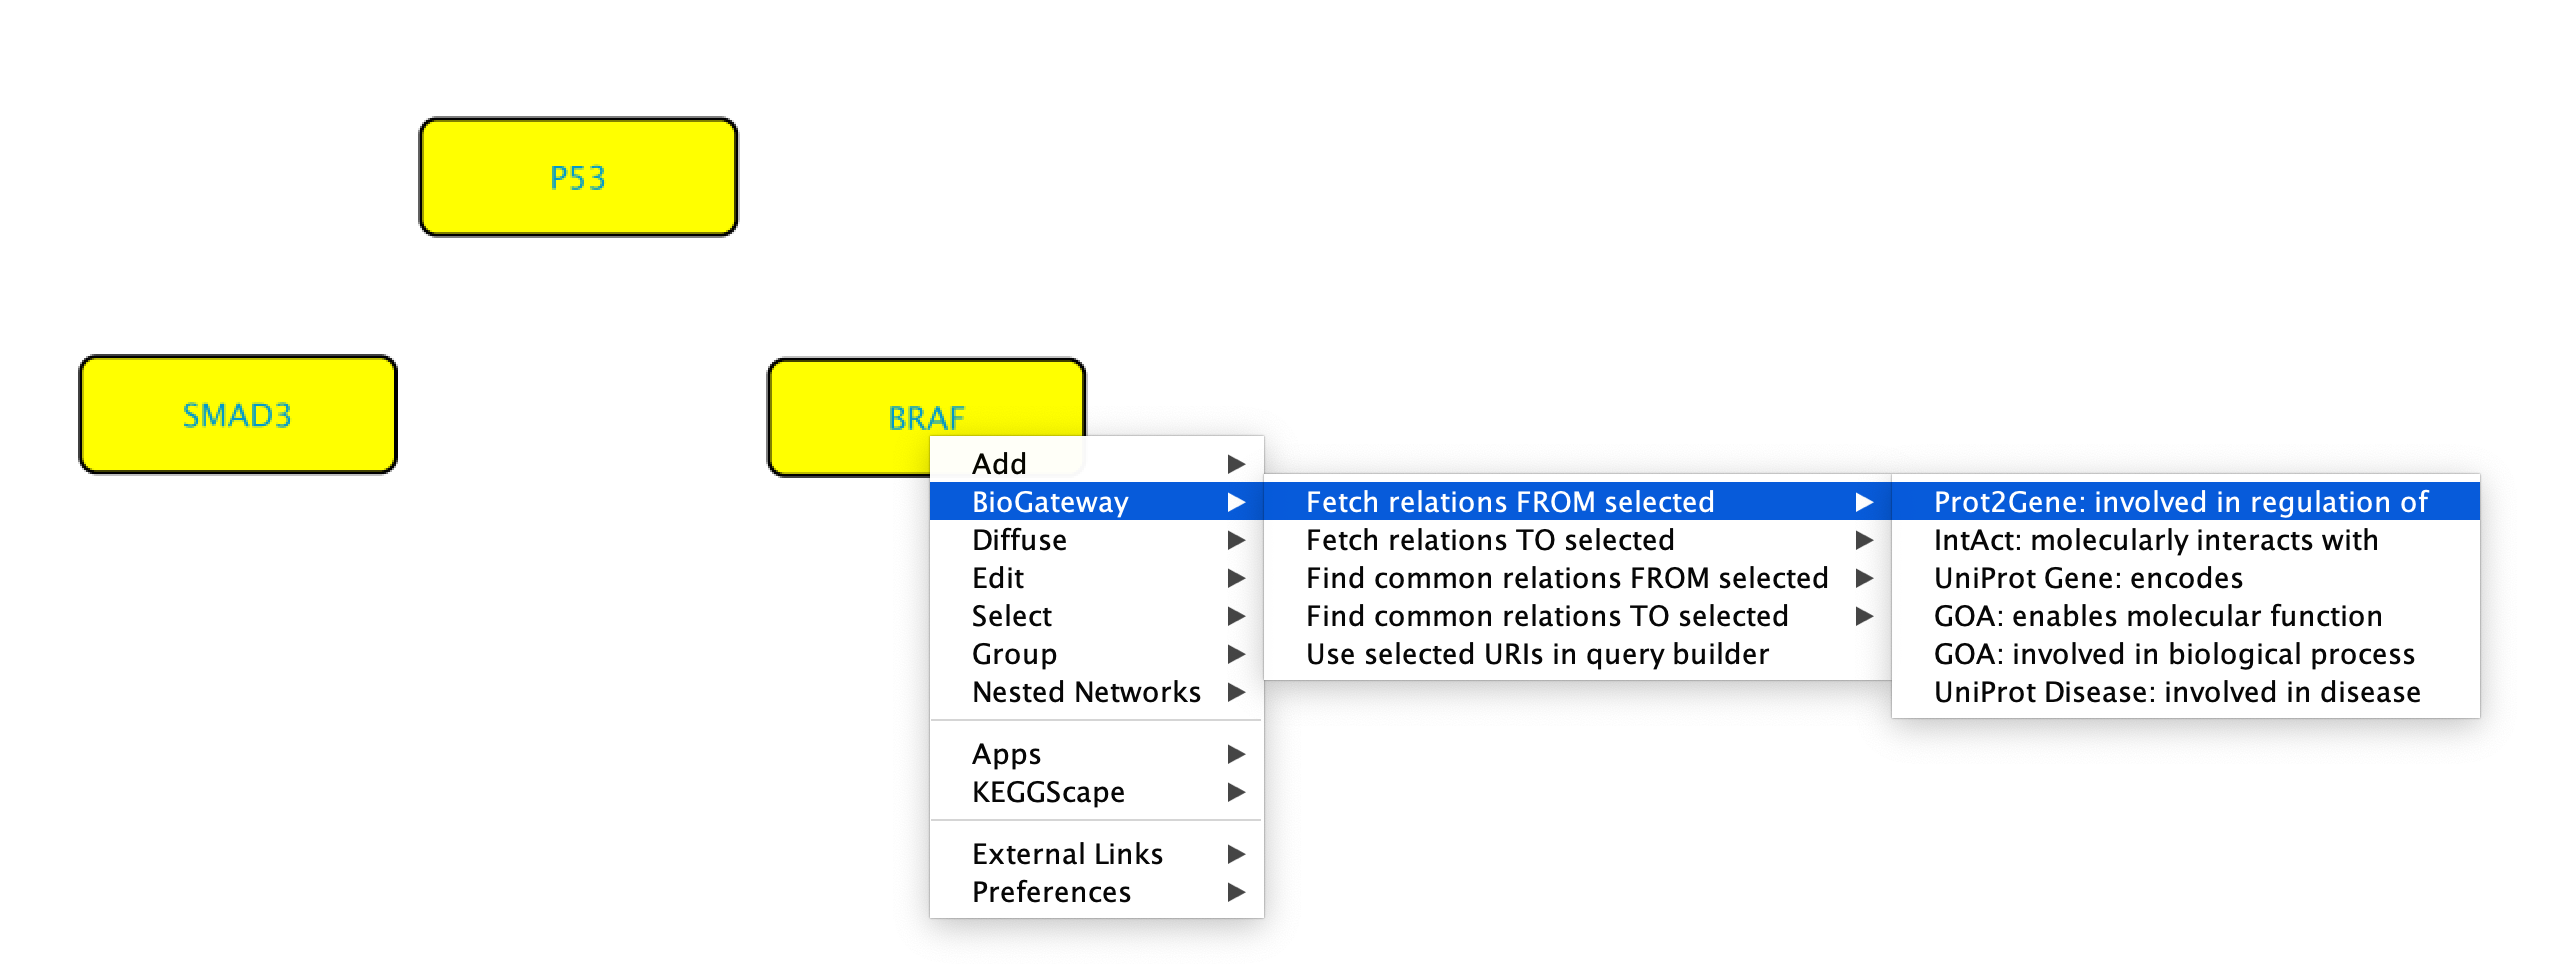
It is also possible to simultaneously use several nodes to create a right-click query. To do so, start by highlighting the nodes of interest followed by right clicking any of them. Now, select BioGateway > Fetch relations FROM/TO selected > select relation type. Please note that when doing this all the nodes will be used as either Subject or Object. After selecting the relation type, the query will be launched and the results will be displayed.
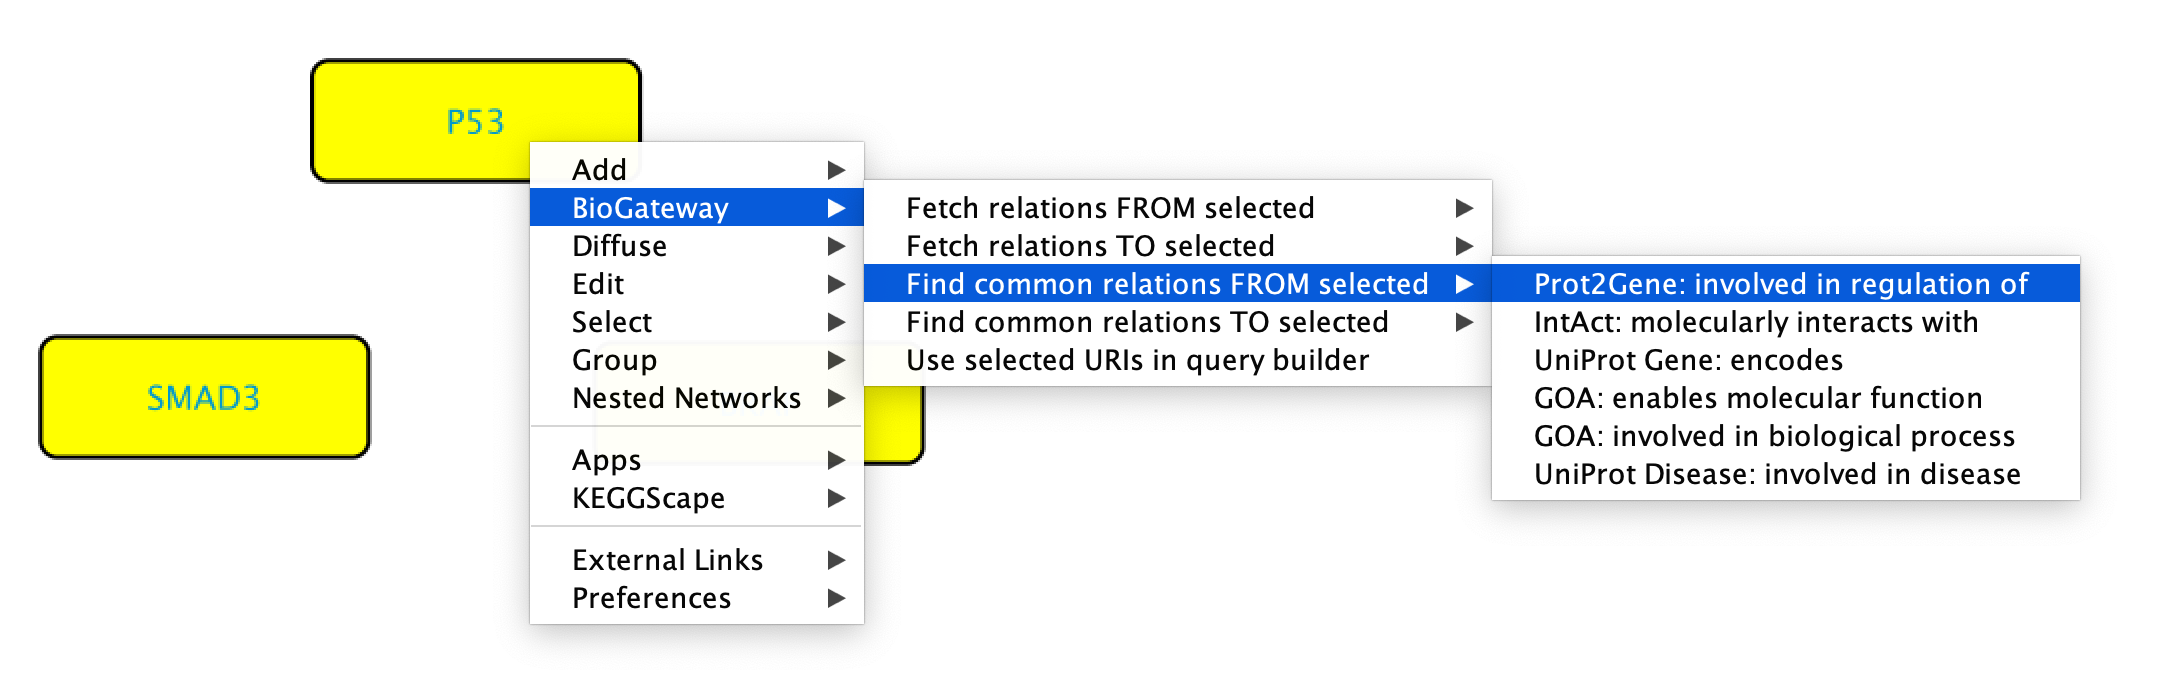
Find common relations FROM/TO selected
When having selected several nodes, it is also possible to search for common relations FROM/TO the selected nodes. This will add a parameter to the search, which will filter only the relations that are shared by a minimum number of the selected nodes.
To get common relations FROM/TO the selected nodes, start by selecting the nodes of interest. Next, right-click any of them and select BioGateway > Find common relations FROM/TO selected > select relation type.
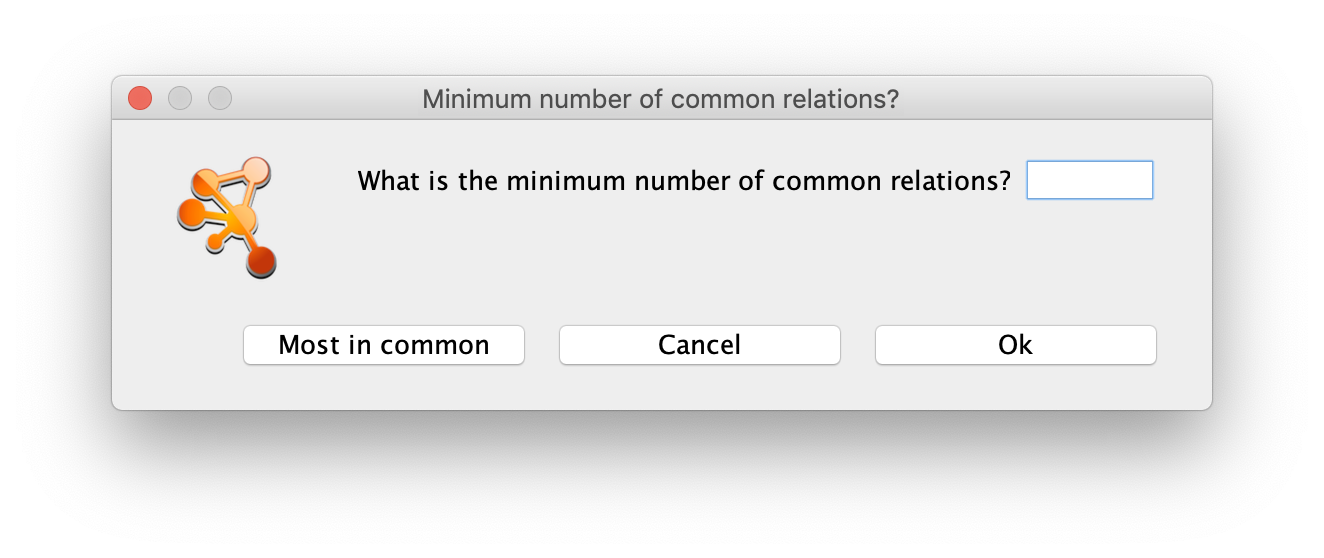
This will trigger a dialog box asking for the minimum number of relations in common going FROM or TO the selected nodes. The user can either enter a number, which will be the parameter used in the filtering of the results, or click the Most in common button. This button will just set the parameter to the highest number of common relations between all the selected nodes. The next step will be to select all the results or only those that are of interest and import them to the current network by clicking the Import Selected button. Alternatively, the Import relations between existing nodes option can also be used.
Selecting/deselecting active properties in the Control Panel
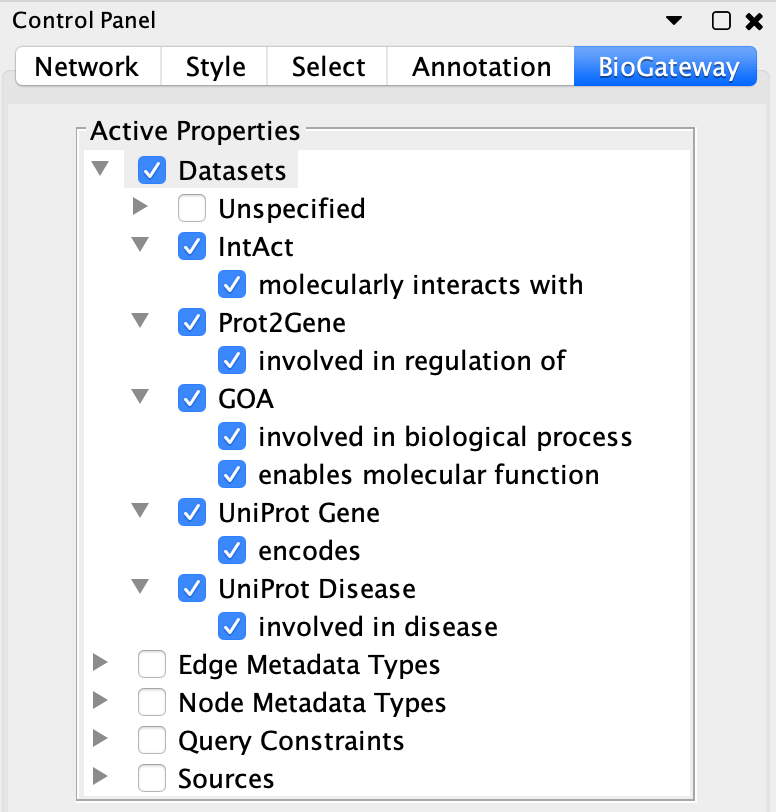
In some cases the users may want to work only with some specific types of relations, while disregarding the others. The BioGateway App offers the possibility of enabling or disabling the different relation types that will appear available when right-clicking on one or several nodes and searching for relationships FROM/TO them.
This is done through the BioGateway tab in the Control Panel of Cytoscape, in the Datasets branch of the Active Properties tree.
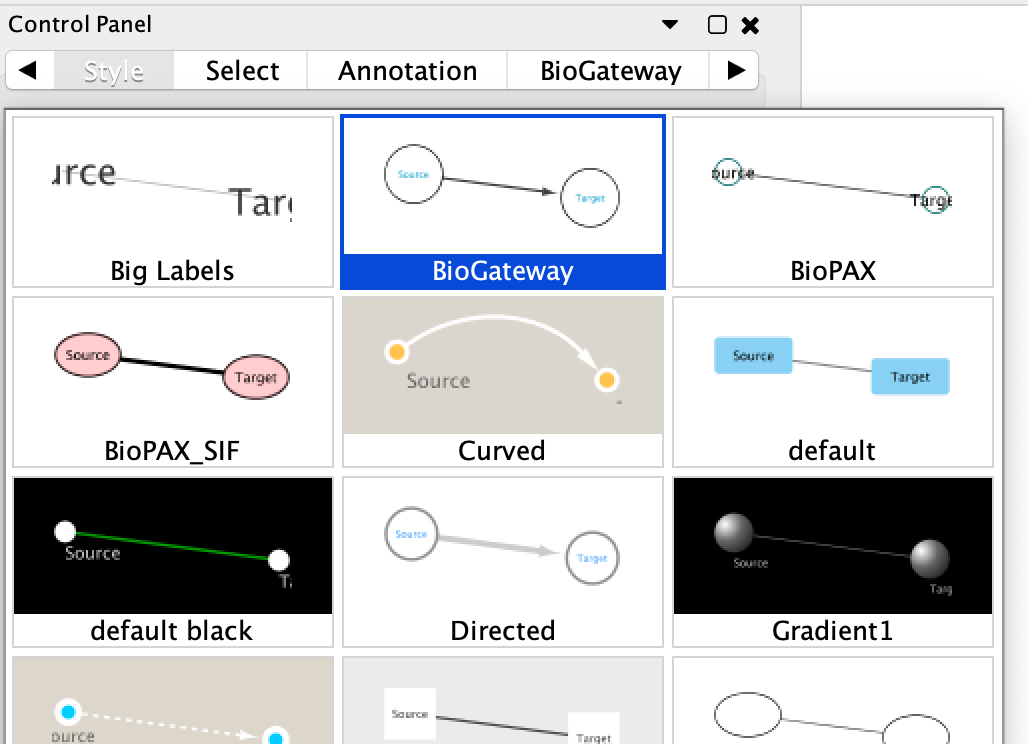
The BioGateway Layout Style
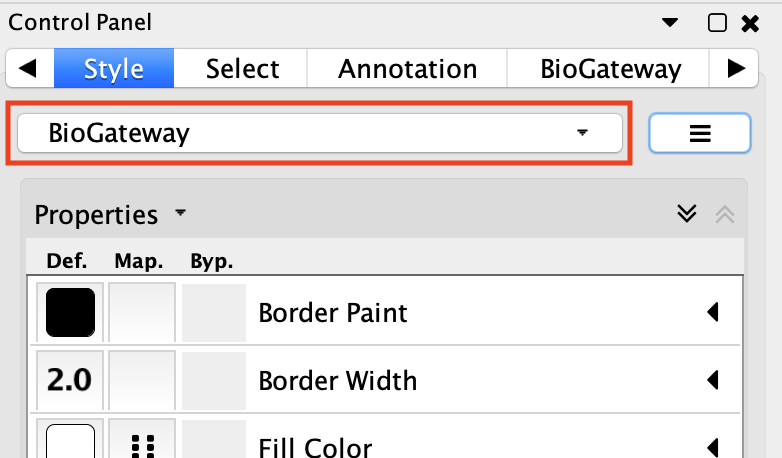
The BioGateway Cytoscape App contains a layout style for the different types of nodes and edges. This layout style is intended to ease the identification of each element in the current network. By default, the BioGateway layout will be automatically applied. If this is not the case, the user can reset the layout style by navigating to the BioGateway Tab in the Cytoscape Control Panel and clicking the Reset Layout Style button. Next, navigate to the Style Tab in the Cytoscape Control Panel, click on the dropdown menu containing the different preloaded styles and select BioGateway.
Nodes Layout
There are four layout styles for the nodes. These are:
- Genes: represented by yellow ovals.
- Proteins: represented by blue rounded rectangles.
- Gene Ontology terms: represented by white diamonds.
- Diseases, and other nodes: represented by white circles.
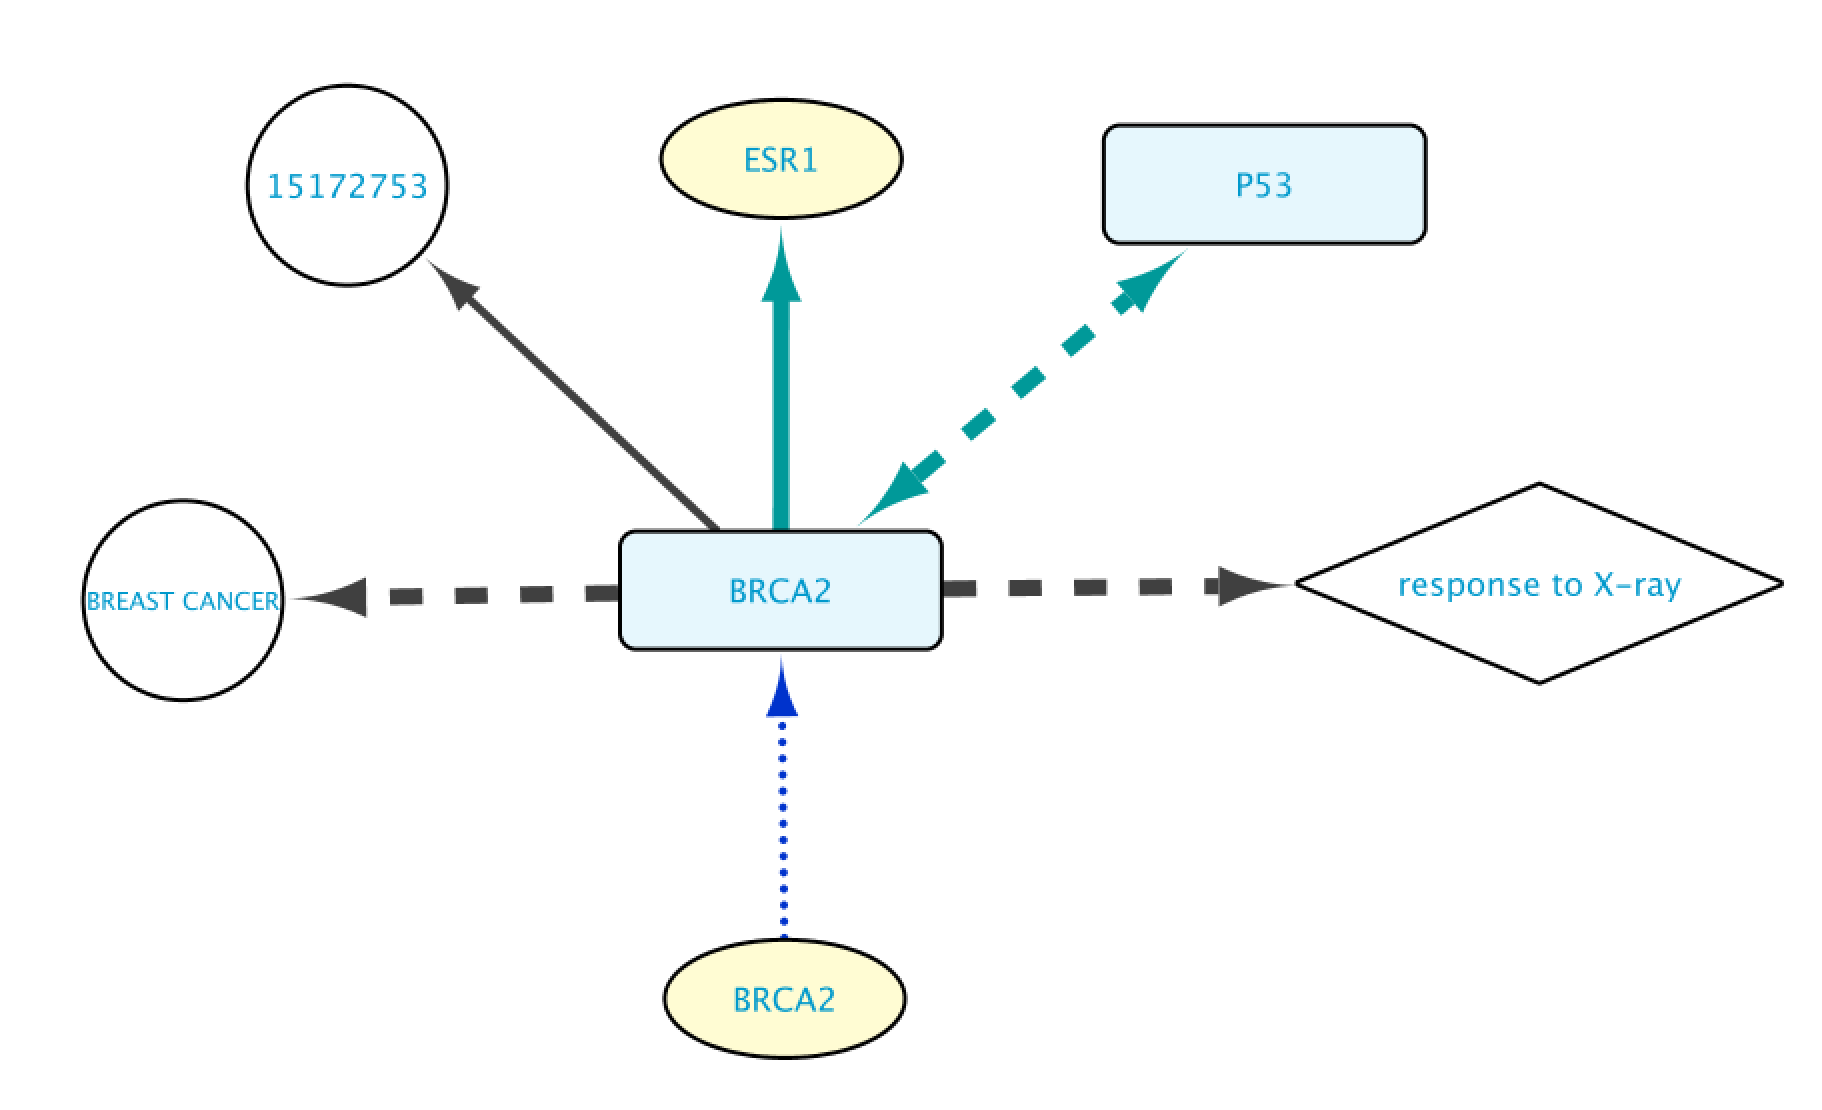
Edges Layout
The different layout possibilities for the edges in BioGateway are:
- Protein-Protein interactions: represented by green, dashed bidirectional arrows. These edges connect two protein nodes.
- Transcription Factor – Target Gene interactions: represented by green, solid unidirectional arrows. This type of edge connects a Protein to a Gene.
- Encoded by: represented by blue, dotted unidirectional arrows. These edges connect a Gene node to a Protein node, representing that Gene A is encoding for Protein B.
- Gene Ontology annotations: represented by dashed, black, unidirectional arrows. This type of edge connects a Protein to a Gene Ontology term.
- Disease annotations: represented by black, dashed unidirectional arrows. These edges connect a Protein to a Disease node.
- Rest of edges: all the other edges are represented by a gray, solid, unidirectional arrow.
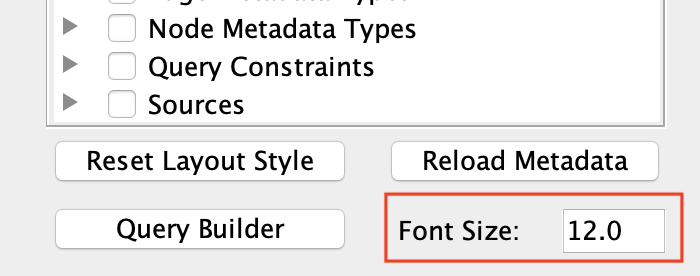
Changing the Font Size in the Query Builder
Depending on the size of the used screen, the Query Builder window can take up a lot of space. To aid the rearrangement of the window, the users can select the font size that will be displayed in the Query Builder.
By default, the font size is set to 12. To change it, simply navigate to the BioGateway tab in the Cytoscape Control Panel and set the desired value.